Please
note: These
instructions are for conventional brakes, not disc brakes. Also, because
brakes are so important for safety, do not work on them unless you’re
confident in your ability to do the job right. And, keep in mind that
in order for brakes to work properly and to make the adjustments explained
in this article, the wheels must be true and round (no side-to-side wobbles,
up-and-down hops or bends).
Keep
the pads clean and free of debris
For optimum braking, the rims and brake pads must be clean. As you use
your brakes, however, the pads strike the rims picking up anything on
them and sometimes transferring rubber deposits to the rims. The pads
even pick up bits of sand and gravel that then grind the sides of the
rims as you brake wearing them prematurely. This is another reason it’s
important to keep the pads and rims clean (rim replacement is expensive).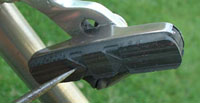
To clean them, dampen a corner of a rag with rubbing alcohol and scrub
the rims to remove any rubber deposits or grimy build up. Then wipe the
surfaces of the brake pads to clean them.
Also, look closely at the faces of the pads (this is easiest if you remove
the wheel). Sometimes you’ll find embedded shards of aluminum from
the rims. Or, you might find small pieces of sand or stone left over from
your last muddy mountain-bike ride. Pick any debris out with a pointed
instrument (photo), such as an awl. This will improve
braking and save your rims.
Replacing brake pads
How often you need to replace brake pads depends on where and how you
ride. The important thing is that you understand how to check your pads
so that you don’t end up without brakes when you need them.
Brake pads wear down a little every time you apply the brakes and you
feel the change at the levers. As the pads wear, you have to pull the
levers further before the brakes start to grab.
When the pads are really worn, you’ll squeeze the levers hard and
the pads won’t grip the way they once did. This is a sign that it’s
time for new pads to restore your braking. Don’t put off this important
maintenance 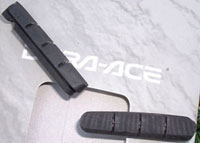 because
when the pads wear down all the way, you’ll have no braking power,
which is dangerous. In some cases, when the pad is worn out, the metal
pad holder contacts the rim and it will only skid along the slick surface
of the rim providing little grip and no braking power. because
when the pads wear down all the way, you’ll have no braking power,
which is dangerous. In some cases, when the pad is worn out, the metal
pad holder contacts the rim and it will only skid along the slick surface
of the rim providing little grip and no braking power.
It’s a good idea to check your pads visually before rides, too.
New brake pads have grooves in them (photo). These channel
water away from the rims to improve wet-weather braking. They’re
also a convenient way to gauge pad wear. When the grooves are almost worn
away, it’s time for new pads.
Pad types
There are two types of brake pads, cartridge and bolt-on. The former is
much easier to replace because it simply slips into the holder and you’re
good to go. Bolt-on pads must be aligned during installation, which requires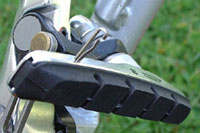 practice to get right.
If you have cartridge pads, there’ll be an open end on the back
of the pad holders (the metal piece the pad slips into; see photo). Sometimes,
there’s a pin (linear-pull brakes) or an Allen bolt (sidepull brakes)
that keeps the pad in place. To replace the pads, remove the pin (photo)
or bolt, push out the bad pad, install the new one and reinstall the pin
or bolt (if necessary).
Keep in mind that pads usually fit a certain way (photo).
Look for 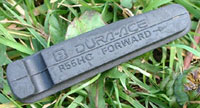 markings
or compare the new one to the old one to make sure it’s oriented
correctly (it’s always best to replace one pad a time so you can
compare the new one with the one still in place). markings
or compare the new one to the old one to make sure it’s oriented
correctly (it’s always best to replace one pad a time so you can
compare the new one with the one still in place).
Pads might be tight, too. If you can’t push it out, try slipping
a small screwdriver between the pad and its holder and prying to get it
out. You should be able to push the new pad in with your fingers. If it’s
a tight fit, make sure you’re putting it in the right way. You can
also breathe on the pad to wet it slightly, which will make it slide in
easier. Or, wet it with some of the rubbing alcohol. This won’t
harm the pad and it will evaporate quickly.
Bolt-on pads are usually one piece with a bolt or post (photo).
To replace these pads, loosen the bolt holding it in place (remove it
if necessary), take out the old pad and insert a new one. Then, carefully
align the pad so that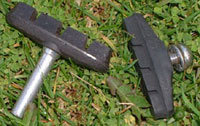 it strikes the rim squarely when the brake is applied.
This usually means manipulating spacers and/or washers, which allow angling
the pad to strike the rim properly. Sometimes these parts corrode slightly
making it difficult to position them as needed. Free the parts by applying
a little lube, which will make it easier to align the brake pad.
And, remember to only work on one pad at a time so you can match the position
of the new pad to the one still in place on the other side of the brake
(they should match).
Pad alignment
In setting the new pads, your goal is to get them to strike the center
of the rim when you apply the brakes (photo). 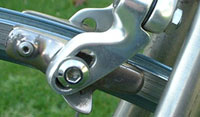 This
involves putting them at the right height and depth (for pads with posts)
so that they contact the rim correctly. Ideally, the entire flat surface
of the brake pad will contact the rim when you brake. This
involves putting them at the right height and depth (for pads with posts)
so that they contact the rim correctly. Ideally, the entire flat surface
of the brake pad will contact the rim when you brake.
If you get the angle wrong, the contact patch will be reduced limiting
your braking power. If the position is really wrong, the pad might rub
on the tire ruining it and causing a flat or dive under the rim and into
the spokes under hard braking. So, take your time and get it right.
Toe-in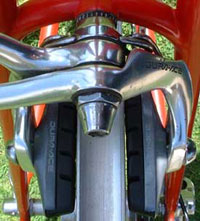
One glitch that affects some brakes and can drive you bonkers (and guarantee
that you never see any wildlife) is squeaking. To prevent this, there’s
a brake pad adjustment called “toe-in.” It involves slightly
angling the leading edges of the pads in to touch the rim first.
As pads wear, the toe-in wears away so you probably won’t notice
this looking at your old pads. With cartridge pads, the toe-in will be
there once you replace the pad. With bolt-on types, however, you’ll
lose the setting when you install the new pad. So, you’ll have to
set it during alignment.
To do this, angle the pads so that there’s about a .5mm gap at the
backs of the pads when the front edges strike the rim (photo).
Some mechanics slip a piece of cardboard under the rear of the pad to
set the angle right.
|