BICYCLE REPAIR

While
bicycle rim brakes offer excellent stopping power, over time the cables
may stretch, the brake pads will wear and a brake may get knocked off
center allowing a pad to drag on the rim. Because your safety depends
on optimum braking, here are guidelines for relatively easy adjustments
any home bike mechanic can do to ensure that your braking is always
at its best.
Please note: Because they are the common
type of brake found on most bicycles, these instructions focus on conventional
rim brakes (brakes that rub against the rims of the
bicycle wheels for slowing and stopping). If you have disc brakes,
which rub against metal discs (called "rotors") attached to
the bicycle hubs (the mechanism at the center of the wheel), there are
three basic tips below. If you need more information, I recommend following
the disc brake manufacturer's instructions. Here's a
good resource for fixing disc brakes from Park Tool.
Note
too, that because brakes are so important for safety, it's best
not to work on your brakes unless you’re confident in your ability
to do the job. And, keep in mind that in order for brakes to work properly
and to make the adjustments explained in this article, the wheels must
be true and round (no side-to-side wobbles, up-and-down hops or bends).
If your wheels are wobbly, here are my easy
instructions for truing bicycle wheels. |
Click
here to learn more brake adjustments. |
Tightening
bicycle brakes the easy way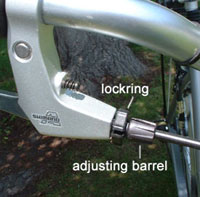
For off-road, comfort, hybrid and city bikes with upright handlebars;
look at the brake levers for a handy device called an adjusting barrel
(photo).
It will have a knurled edge for easy gripping and it makes adjusting
your brakes easy without tools. It’s perfect for making your brakes
feel like new after you’ve logged a good many miles and worn down
your pads. And you can even use it on rides if your brakes begin to
feel weak as sometimes happens when it's muddy or wet.
To use adjusting barrels, turn them counterclockwise by hand and check
the setting by squeezing the levers. When the brakes feel right, lock
the barrel adjusters in position by turning the lockring (the second
knurled piece) clockwise until it's tight against the lever.
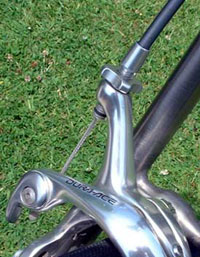
On road bikes with dropped handlebars, you’ll find the adjusters
on the brakes (photo below). To tighten the brakes,
turn the adjusters in the direction that moves the pads closer to the
rims.
 Keep
in mind that when your brake pads wear out, the adjusters won’t
do any good and you’ll need to turn the adjusters all the way
back and replace your brake pads. On my Shimano Dura-Ace and Ultegra
brakes, I use Kool
Stop brake pads. Keep
in mind that when your brake pads wear out, the adjusters won’t
do any good and you’ll need to turn the adjusters all the way
back and replace your brake pads. On my Shimano Dura-Ace and Ultegra
brakes, I use Kool
Stop brake pads.
Wheel centering in the frame and fork
One of the most common brake problems is a dragging brake pad; one that
remains against the rim or stays close to it after you’ve released
the brake lever.
The most common cause of this problem is a misaligned wheel. This can
occur when you reinstall your wheel after removing it to put your bike
on a roof rack or to fix a flat tire, and you don’t get it exactly
centered in the frame or fork.
This causes the brake to work improperly because it’s tight on
the frame and has been adjusted to align properly only on a wheel perfectly
centered in the bicycle. Now that the wheel is crooked in the frame,
the brake can't work correctly.
To correct the dragging shoe, simply center the wheel in the fork or
frame. For most wheels, all that’s usually required is loosening,
making sure the wheel is fully inserted in the fork or frame, and tightening
the wheel. (If the bike is standing, just press down on the handlebars
for the front wheel and the seat for the rear wheel to push them fully
into the frame and center them.)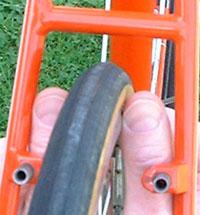
If you have a frame that lets you place the rear wheel in different
positions, check that the wheel is centered between the seatstays and
chainstays before tightening it. You can do this by looking at it, or
use your fingers as “feeler gauges” by sliding the same
finger on each hand between the frame and rim or tire feeling if it’s
centered (photo; the brake was removed so you can see
the details).
Bicycle brake centering
If your wheels are centered and the brake still drags, the brake may
have gotten bumped and knocked out of position on the frame. Start by
double-checking that the wheel is centered in the frame because you
don’t want to ruin the brake adjustment if it’s actually
set correctly.
To center sidepull brakes (road bikes), loosen the attaching bolt behind
the fork crown or brake bridge until the brake is loose (here's a
good tool for that). (The brake should move sideways when you push
it).
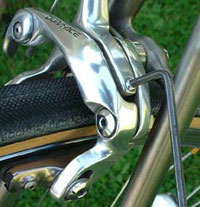 Now, squeeze the lever to hold the brake pads against the rim while
you tighten the brake bolt on the back of the frame. If the brake needs
minor fine-tuning after this, look for a small screw (it might be an
Allen type) on top of the brake. Clockwise turns (photo left)
will move the brake shoe on the side of the screw away from the rim
and vice versa. (This screw is not intended for major adjustments.)
Now, squeeze the lever to hold the brake pads against the rim while
you tighten the brake bolt on the back of the frame. If the brake needs
minor fine-tuning after this, look for a small screw (it might be an
Allen type) on top of the brake. Clockwise turns (photo left)
will move the brake shoe on the side of the screw away from the rim
and vice versa. (This screw is not intended for major adjustments.)
If adjusting the screw doesn't center the brake, screw it back to where
it was and double-check how well centered the wheel is because that's
probably the problem.
To center linear-pull brakes (off-road and hybrid bikes), look for a
small 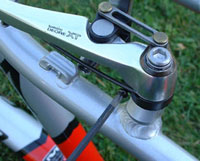 screw
in the side of the brake arm. Clockwise turns of this screw (photo
right) will move the pad in the arm with the screw away from the rim
and vice versa. screw
in the side of the brake arm. Clockwise turns of this screw (photo
right) will move the pad in the arm with the screw away from the rim
and vice versa.
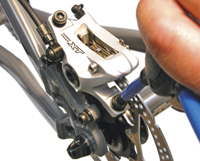
Brake binding
Brakes should operate smoothly and easily and the brake pads should
snap away from the rims when you release the levers. If not, the brake
pivots or cables might be dry, causing binding. To free the pivots,
lightly lubricate the brakes where the arms pivot (photo
below) and squeeze the levers 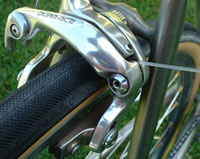 repeatedly
to work the lube into the brakes. (Be sure NOT to get any lube on the
brake pads or rim. If some gets on them; wipe them clean with rubbing
alcohol.) repeatedly
to work the lube into the brakes. (Be sure NOT to get any lube on the
brake pads or rim. If some gets on them; wipe them clean with rubbing
alcohol.)
Better? If not, it might be the cable that needs lube. Usually, this
is only required on rear cables with split housing (if you have split
housing you can see the middle of the inner cable and the housing is
in two pieces).
Look closely at where the housing sections enter the stops on the frame.
If the stops are split, you’ll be able to remove the housing and
lubricate most of the cable. If the housing stops aren't split, raise
the bike so that gravity will draw the lube into the housing section,
apply a few drops of lube on the cable and squeeze the rear brake lever
to draw the lube into the housing. Repeat for the front section of housing.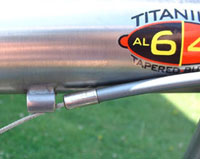
If the housing stops are split, open the quick release on sidepull brakes
or unhook the noodle on linear-pulls. This should provide enough slack
so that you can pull gently on the housing sections and free them from
the frame stops (photo). If you need more slack, squeeze
the brake shut with your hand.
When the housing is released from the stop, slide the rear housing section
(with flat-handlebar-equipped bikes you’ll be able to slide the
front housing section, too) along the cable so that you can lubricate
the cable where it runs inside the housing, which should eliminate the
binding. Then reconnect the cables and your brakes should feel as good
as new.
 Three
quick and easy disc brake maintenance tips Three
quick and easy disc brake maintenance tips
1. Whenever either or both wheels are removed from a bicycle
do not squeeze the brake levers, because it will cause the disc brake
pads to try to brake and the pads will become stuck in the braking position
making it difficult to put the wheel(s) back in the frame. If this happens,
gently pry with the tip of a large regular screwdriver placed between
the pads to get them back in place.
2.
If a rotor becomes bent, it will cause the brake pads to drag on the
rotor essentially applying the brake and making it harder to ride. With
a little trial and error, you can straighten the bend(s) by prying with
an adjustable wrench with its jaws adjusted to just slip over the rotor.
Or you might want to get Park
Tool's Rotor Truing Fork.
3.
Just like with rim brakes, the component on disc brakes that wears out
the most often is the brake pads. It's a good idea to keep some spares
in your home shop because it's relatively easy and fast to replace worn-out
pads on most brands of disc brakes.
|
