![]()


![]()

Click to enlarge
Everything you need to know to build
a great home bicycle workshop!
![]()
Click pictures to learn more
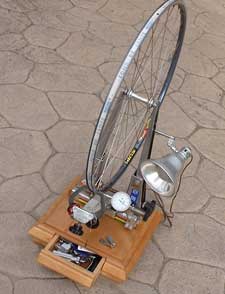
My truing stand
More truing stands & wheel tools
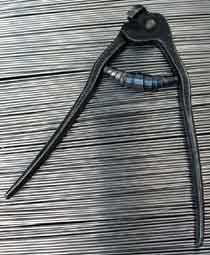
Eldi emergency spoke tool
Eldi Emergency Spoke Bicycle Tool
A Spoke Recycler
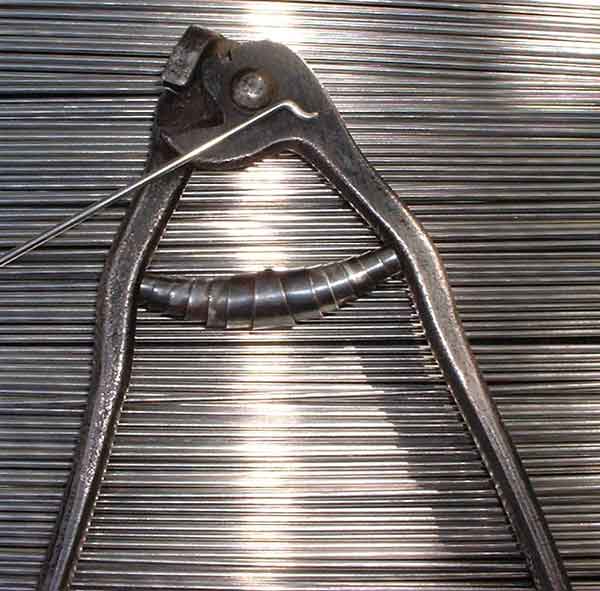
The great thing about this bicycle spoke cutter and bender is that it allows a mechanic equipped with a handful of long spokes to fix bicycle wheels of any size. How? The tool shears the head off the spoke. Then, by holding the spoke just so in the tool’s jaws and squeezing the handles, an S shape is bent into the spoke’s end as shown. Because you can put this shape anywhere along the spoke’s length, you can size long spokes to fit every size wheel.
A Ride Mechanic’s Treasure
This spoke shaper is the perfect tool when you’re wrenching for a ride or race. Instead of carrying several common spoke lengths for repairs, simply pack a supply of long spokes and you’ll be prepared to repair any wheel that needs help. It came in very handy one year when I was manning a century rest stop in Paso Robles, California during the Great Western Bike Rally. Early in the day, I repaired a 700c wheel and in the afternoon, a couple came through on a Bike Friday Family Tandem with 20-inch wheels. I used the Eldi to size spokes to fit and saved three riders from having to SAG in.
A Ridesaver
Bicycle spokes with this S bend are known by tourists as emergency spokes because the special bend simplifies installation. Carry some emergency spokes inside a pump, handlebar or bag and should you break a spoke, simply wiggle it out of the hub and you’ll be able to poke the emergency spoke’s S-shaped head in its place. You won’t have to remove the wheel, cassette, tire, tube or nipple (assuming you were smart enough to prepare emergency spokes that match the nipples in the wheel). So, these spokes come in very handy. And, they’re strong, too. I’ve ridden for years on one with no problems.
A Keeper
I’ve searched for this tool without luck so I don’t believe it’s available any longer. It’s possible to create emergency spokes by cutting the heads off with diagonal cutters and bending the S with pliers. But, that’s a crude way to go compared to Eldi’s solution.
Update on finding a tool that can create the bend: The wonderful wheel resource Wheel Fanatyk now offers their Z-bend Spoke Repair Pliers. Also, ace mechanic Roger at PacTour told me about a tool for lawnmower throttle cables that can do this. It should be available at lawn-care stores.
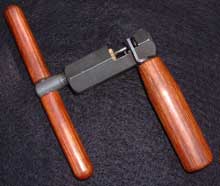
Shimano Pro-Set HG chain cutter
Shimano Pro-Set HG Bicycle Chain Cutter

Almost Too Nice to Use
This photo depicts my prize bicycle chain tool just about life size. Put your hand up to the photo and you can imagine using it. The handles are rosewood and wonderfully smooth. You might not think it would make a difference when working on grimy links, but I swear it makes the job easier. It’s not so much the quality of the wood perhaps, but the size of the handles. A nice detail is a small screw on the bottom of the handle that when removed, reveals two Hyperglide chain pins stored inside. The tool’s pin is easily replaced too, of course.
I Earned It
I favor this fine chain tool (and I’ve got about a half dozen different types) but it’s special for another reason: the way I got it. It was gift from Shimano for working as a mechanic on their neutral support team during the Mountain Bike World Championships in 1995. Every time I pick up this beauty it reminds me of that great week in Vail, Colorado.
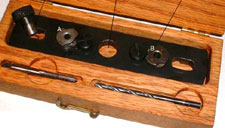
Custom classic Campy triple tool
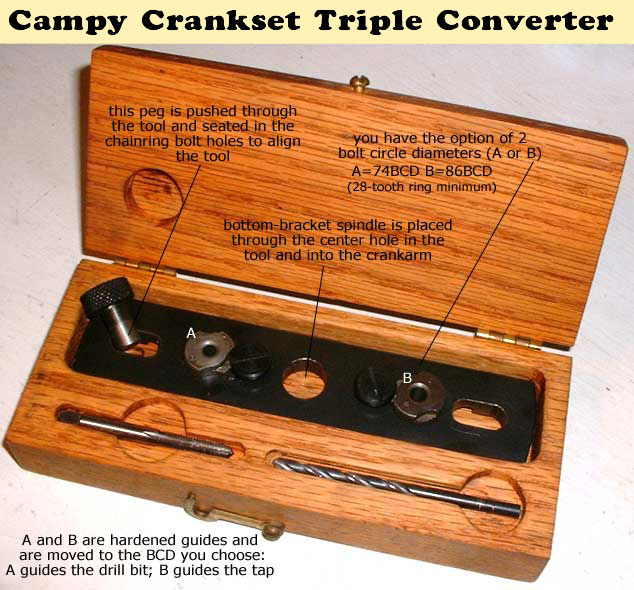
This is an unusual and rare bicycle tool made by a machinist in Southern California and sold in the early eighties to bicycle shops who used it to convert Campagnolo Nuovo Record and Super Record double cranksets into triples (the smallest chainring these accept is 41-tooth; not very small).
The jig is held in place by the bottom bracket axle and you can then accurately drill and tap 5 holes in the spider. Into these holes you insert Avocet/Ofmega triple-conversion adapter bolts. These are steel and are mounted to the spider with locktite if the crank will remain a triple. The adapters have female threading on the backside to accept standard chainring bolts. To install the granny ring, you simply rest it atop the Avocet/Ofmega adapters, screw in the chainring bolts and easy pedaling is yours!
I recently found a new home for this tool with a bicycle club that has several Campy-equipped classic bicycles in need of triple conversions.
My toolboard
![]()
Click to enlarge even more!
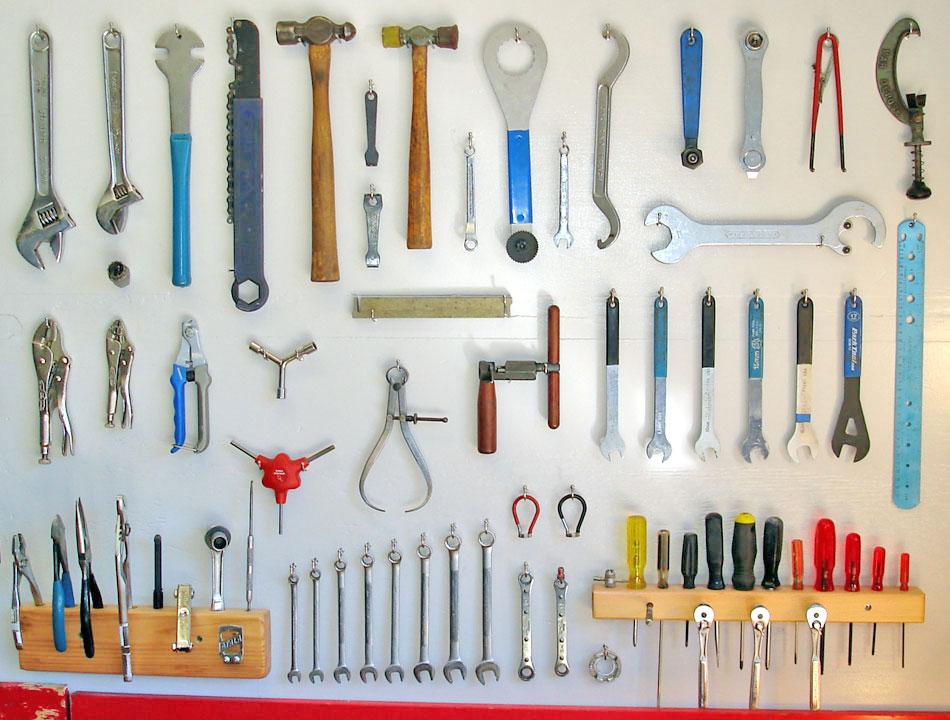
Toolboards are personal things. Mine reflects the bicycles I maintain, the tools I like most and a design that works for me and my workshop. I try to place the most frequently used tools closest and design the board so that the tools are within easy reach. I don’t want to have to move too far from the bicycle repair stand or stand on my toes to reach a tool. I also don’t want too many tools on my board because it only spreads the tools further apart and makes it more difficult to find tools, which slows you down. I keep my cutting and milling tools in drawers to protect the sharp edges, and also because they’re not used as often as the basic hand tools, so it’s no biggie to open a drawer to get them.
I’ve used finishing nails in the past for my toolboards and they work fine. This time I tried something different, little screw-in ball-end stainless-steel hooks. It’s not as easy to get the tools off them, but they sure look nice and I think I won’t mind taking a little more care when reaching for tools. This is a new plier tools arrangement for me, too. I typically mount each plier tool to the board separately; however, this new approach makes them much more accessible because one handle is free and easy to grab. The 2 x 4 rack also provides a superior way to hold the ratchet, 8mm Allen and tape measure (it’s missing from the photo; it clips to the Atala headlight bracket).
A good way to make your own toolboard is to pick up a bike box at a shop. Cut one side off it and lay it on the ground. Take all the tools you want on your finished toolboard and lay them out carefully on the cardboard. Move them around until you have them just the way you want them. Then you can trace around them with a Sharpie marker. You now have a handy template, which you can hold against your plywood. Simply drive nails through the tracings right where the nails will support the tools, pull the template off and hang your tools. Have fun!
Oh, if you’re wondering, those three small ratchets on the right 2 x 4 hold a 4, 5 and 6mm Allen wrench. The little gizmo protruding to the left of them is a combination magnet/screw holder and the T-shaped item left of the yellow screwdriver is a valve tool.
Finally, people ask why I don’t outline my tools on the toolboard. This is a common technique in shops where many people use the toolboards. It helps at the end of the day when you want to do a quick inventory and make sure every tool is back in place and it helps non-mechanics put the tools back in the right place. In a home shop, you get used to where your tools belong and you don’t really need to outline them. Also, not having outlines is good motivation to return the tools as you work, which keeps your workbench clean and makes it easier to find the tools when you need them. Quick tip: if you look high and low and simply can’t find the tool, check your apron pocket. Without tool outlines, toolboards look cleaner, too, and I like that. It’s the same reason I don’t use pegboard for my toolboard. I find all those holes distracting compared to simple plywood.
On this webpage you can see pictures of the beautiful toolboard of world-renowned professional mechanic Pietro Piazzalunga (and read a fascinating interview with him, too).
![]()
Bicycles are easy and fun to fix. Everything’s right there, easy to see and figure out. With basic hand tools, you can make many common repairs. Just by riding, you can diagnose problems. And even advanced bicycle repair such as wheelbuilding is within your reach . . . (more)
Here are articles that’ll help you achieve your wrenching needs and goals. Maybe you’ll even become a pro mechanic (a great occupation, because you can get a job anywhere, and every repair is different; be sure to read my story about wrenching at the world championships)! Plus, you too might land a gig as a cycling journalist (read my weekly Tech Talk column).
If you'd like say thanks for helping with your bicycle repair or help me keep this site going, this button takes you to PayPal where you can make a secure donation of any amount. Thanks!
Twenty-five Repair Articles (some with videos)
Click the 1938 bicycle wrenches to see the articles:
If you'd like to say thanks for helping with your bicycle repair or help me keep this site going, you can now donate using this PayPal button. Thanks!
![]()
Videos open in a new window on my youtube channel.
- Patching Tubeless Flat Tires with Dynaplugs
- How to Build Bicycle Wheels the Easy Way!
- How to Inspect a New Set of Bicycle Wheels!
- Removing Praxis Zayante Cranks
- Removing a tire with only your hands
- Installing a tire with only your hands
- Park Tool's Amazing BX-3 Rolling Big Blue Bicycle Mechanic's Tool Box
- How to Set Up Park Tool's BX-3 Pro Bicycle Mechanic's Tool Box
Quick Repair Tips
- If you have a bumper-mount car rack for carrying your bikes, use it as a repair . . .
- When you have a flat on your bike, before removing the wheel, always . . .
- If you’re unlucky enough to break a shift cable on a ride, try . . .
- The best place to store a bicycle is . . .
- An easy way to true a wobbly wheel is . . .
For more excellent bicycle-repair help, visit:
- Sheldon Brown (pro mechanic)
- Park Bicycle Tools (repair procedures and tools)
- Bicycle Tools, Etc. (tools and small parts)
- McMaster-Carr (fine online hardware store)