| Shift
onto the small cog and small ring
 This
creates slack in the chain, which makes wheel removal much easier. If
you’re riding, shift as you slow to a stop so that the chain is on
the smallest rear cog and the smallest chainring in front. If you’re
not riding, shift the levers (one at a time), lift the bike by the seat
and pedal by hand to shift the chain. This
creates slack in the chain, which makes wheel removal much easier. If
you’re riding, shift as you slow to a stop so that the chain is on
the smallest rear cog and the smallest chainring in front. If you’re
not riding, shift the levers (one at a time), lift the bike by the seat
and pedal by hand to shift the chain.
Note: Some bicycles may have a nifty feature called a
chain rest, a small peg a few inches up the seatstay or a peg or platform
near the bottom cog. You can place the chain on this so that there is
some tension in it even when the wheel is removed. This keeps the chain
from dragging in the dirt when you rest your bike on its left side as
you fix a flat. Just be sure to carefully place the chain on the cog again
when you replace the chain.
If you forget this step, it’s possible to bend or break the chain
rest if you try to ride your bicycle while the chain is still on it.
Like the idea of a chain rest but don’t have one on your bike? Check
out Columbine’s Quikchainger.
Open the brake
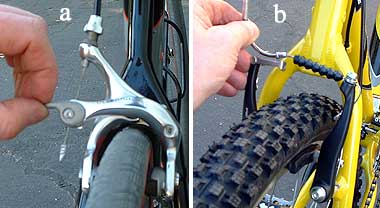 On most bikes when you try to remove the wheel, the tire bumps into the
brake pads.To prevent this, open sidepull brakes (road bikes) by fully
rotating the little lever on the brake upwards (photo a). For linear-pulls
(common on mountain bikes and also called V-brakes or direct-pull brakes),
lift the end of the noodle out of its holder (photo b).
On most bikes when you try to remove the wheel, the tire bumps into the
brake pads.To prevent this, open sidepull brakes (road bikes) by fully
rotating the little lever on the brake upwards (photo a). For linear-pulls
(common on mountain bikes and also called V-brakes or direct-pull brakes),
lift the end of the noodle out of its holder (photo b).
Some sidepulls are opened by pressing
a button on the lever. Look for this if there’s no lever on the brake.
Open cantilever brakes (these feature a cable that runs over the top of
the tire) by lifting the cable end on one side out of its holder. If you
have disc brakes, you can skip this step!
Remove the wheel
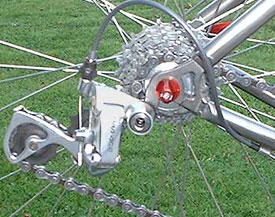 Lastly:
with one finger placed on a non-greasy part of the rear derailleur (avoid
the chain and the pulleys), pull back on it to get it, and the chain,
out of the way. Lastly:
with one finger placed on a non-greasy part of the rear derailleur (avoid
the chain and the pulleys), pull back on it to get it, and the chain,
out of the way.
This will keep the wheel from hanging
up on anything and getting stuck when you open
the quick release and remove the wheel.
This is the secret to easy wheel removal. Good job!
Note: To clearly show the desired derailleur position in the photo
to the right, I locked it in place and didn’t show my hand. You must
pull it back by hand when removing wheels because it won’t stay in
place on its own.
Click
to see another photo that shows how I hold this type of derailleur
to pull it back (without getting my fingers greasy) to make wheel removal
easy (the photo will open in a new browser window).
Install the wheel
This process is essentially removing the
wheel in reverse! Be sure to rest the chain on the right cog
on the cassette (photo: Step 3). It has to go on the cog that it was on
when you took the wheel off. This should be the smallest cog, but sometimes
you might forget to shift down there first before you remove the wheel
— and if that’s the case, you’ll want to shift the shift
lever several times BEFORE trying to put the wheel back on to make sure
the derailleur is in the right place.
Then, assuming you're right handed, you
can usually stand next to the bike so that you’re on the left side
at the back of the bike. Hold the bike off the ground by the seat, while
you hold the rear wheel with your right hand. Move slightly so you can
look down at the rear wheel and frame. You should be able to sort of manipulate
the wheel so that the small cog goes into the loop in the chain (between
the upper and lower runs). Wiggle the wheel so that it fits into the dropouts
on the frame. You might have to reach down and tap the quick release sideways
to free one end, which may have gotten stuck, or to make some clearance.
Or, the quick release might have closed and you’ll need to open it.
Also, be sure the brake quick release is open (photo: Step 2), because
the wheel won’t fit easily, if at all, if it’s not. With a little
practice, you should be able to get the wheel in without ever touching
the chain.
For bolt-on wheels (held on with nuts; no quick release).
If you’re dealing with axle nuts instead of a quick release, you
need to manipulate the washers so that they’re outside the dropouts,
not inside. It’s also important when tightening the wheel to only
snug the right nut, then snug the left. Then go back and add a little
more tension on the right nut, then the left (or the left and then the
right), etc. until the wheel is tight. That’s the safe way to tighten
a wheel with axle nuts because it prevent changing the bearing adjustment,
which can happen if you just tighten one nut all the way without equally
snugging the other.
FINAL STEP: Make sure the wheel is centered in the frame and fastened
tightly. The final and most important step is to make certain
that the wheel is securely engaged in the frame (not just partially inserted
because it can come loose when riding causing a crash), and that the wheel
is centered in the frame both at the brake (top) and at the chainstays
(bottom). The brake may drag if the wheel is out up top and the tire could
rub if it’s misaligned at the bottom. So double-check and get it
right.
|