BICYCLE REPAIR
|
|
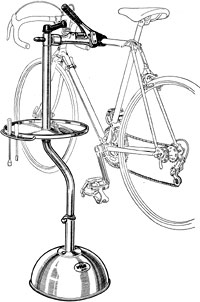
| Equipment: Round up the following:
|
|
 Gripping each crankarm with one hand, push and pull laterally to check
for play in the bottom bracket (photo). If necessary, use the appropriate
bottom bracket (BB) tools to remove play. Depending on what type of BB you
have, you may need to remove the crankarm first. Any play in the BB bearings
makes it impossible to properly adjust the front derailleur. While you’re
working on the crankset, check each crankbolt with the 5-mm allen wrench
(or a Torx wrench if you have that type of bolts) to make sure they’re
tight.
Gripping each crankarm with one hand, push and pull laterally to check
for play in the bottom bracket (photo). If necessary, use the appropriate
bottom bracket (BB) tools to remove play. Depending on what type of BB you
have, you may need to remove the crankarm first. Any play in the BB bearings
makes it impossible to properly adjust the front derailleur. While you’re
working on the crankset, check each crankbolt with the 5-mm allen wrench
(or a Torx wrench if you have that type of bolts) to make sure they’re
tight. |
Gripping each crankarm, push and pull |
Replace rusted or frayed cables and corroded housing |
Lightly grease the new cable's head and where it runs inside housing or on the bottom bracket guide and run it through the lever, housing (or BB guide), and stops to the anchor bolt (photo). Don’t tighten the cable or anchor bolt yet. Apply a little lube to the derailleur pivot points and wipe off the excess. Check the tightness of the cage bolt (at the lower end of the cage) with a screwdriver. Next, lift the chain off the smallest chainring and place it on the bottom bracket of the frame. Turn the crank by hand while looking at the chainrings from above. Using one side of the front derailleur cage as a reference, observe the trueness of each ring. If they wobble, true them by prying gently with the adjustable wrench (set the jaws just wide enough to slip over the ring). Another way to straighten warped or bent chainrings is to tap on the wobble with a plastic mallet. This takes a little practice, but it works nicely when you get the hang of it. Place the chain back on the ring. |
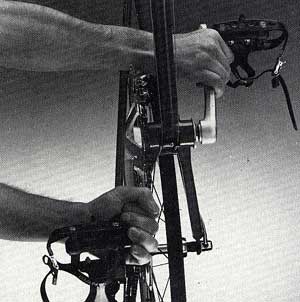
 When viewed from above, an imaginary line through the center of the derailleur
cage should be parallel to the chainrings. Next, look at the derailleur
and large chainring from the side. Pull the cage outward with your hand.
It should clear the large ring by about 1/16 inch/ 2 mm (photo).
If necessary, loosen the frame clamp (or for braze-on derailleurs, loosen
the attaching bolt) with an allen wrench and adjust the derailleur position.
When viewed from above, an imaginary line through the center of the derailleur
cage should be parallel to the chainrings. Next, look at the derailleur
and large chainring from the side. Pull the cage outward with your hand.
It should clear the large ring by about 1/16 inch/ 2 mm (photo).
If necessary, loosen the frame clamp (or for braze-on derailleurs, loosen
the attaching bolt) with an allen wrench and adjust the derailleur position.
|
Look at the derailleur and large chainring from the side |
Adjust the low-gear (inside) limit screw |
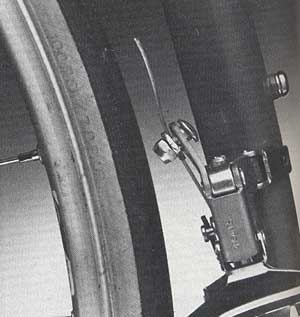
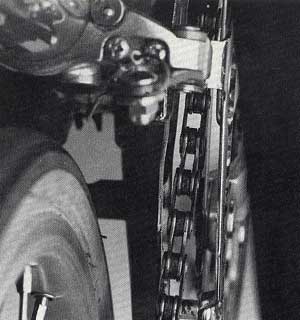
 Shift
to the largest freewheel cog and smallest chainring. Adjust the low-gear
(inside) limit screw so there is 1/32-inch/ 1 mm clearance between the
inside of the inner cage plate and the chain (photo). Clockwise
turns limit derailleur travel, and counterclockwise turns increase it. Shift
to the largest freewheel cog and smallest chainring. Adjust the low-gear
(inside) limit screw so there is 1/32-inch/ 1 mm clearance between the
inside of the inner cage plate and the chain (photo). Clockwise
turns limit derailleur travel, and counterclockwise turns increase it. |
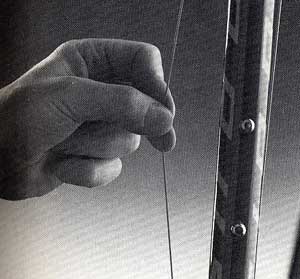
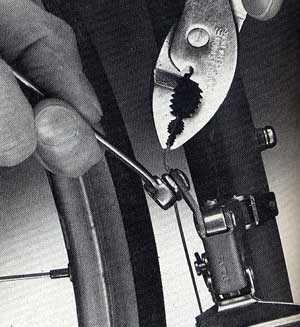
 Make sure the front shift lever is in its starting position (shift the
chain onto the smallest chainring by hand). Also, make sure that any cable
housing is seated inside the lever and the cable stop(s) because otherwise
when it pops into place, it’ll create slack ruining your cable adjustment.
When the cable and housing is seated correctly, pull lightly on the cable
with pliers to remove slack and tighten the anchor bolt with a wrench
(photo).
Make sure the front shift lever is in its starting position (shift the
chain onto the smallest chainring by hand). Also, make sure that any cable
housing is seated inside the lever and the cable stop(s) because otherwise
when it pops into place, it’ll create slack ruining your cable adjustment.
When the cable and housing is seated correctly, pull lightly on the cable
with pliers to remove slack and tighten the anchor bolt with a wrench
(photo). |
Pull lightly on the cable with pliers and tighten |
Adjust the high-gear (outside) limit screw |
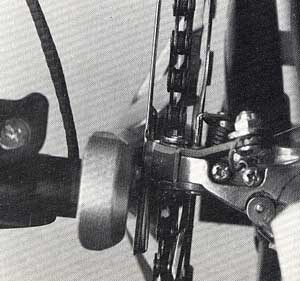
 Shift
to the largest ring/smallest cog combination. Adjust the high-gear (outside)
limit screw so there is at least 1/32-inch / 1 mm clearance between the
inside of the outer cage plate and the chain. Also, the cage shouldn’t
travel outward so far that it strikes the crankarm (photo). Shift
to the largest ring/smallest cog combination. Adjust the high-gear (outside)
limit screw so there is at least 1/32-inch / 1 mm clearance between the
inside of the outer cage plate and the chain. Also, the cage shouldn’t
travel outward so far that it strikes the crankarm (photo). |
Go for a neighborhood test ride. If overshifting occurs (the chain falls off), tighten the appropriate limit screw half a turn at a time and test. If shifts are hesitant, looosen the appropriate limit screw half a turn at a time. |
Check for cable slack and remove it |
|
This article
is based on one I wrote for the April 1991 issue of Bicycling Magazine.
The photos are by Mel Lindstrom. I set up the shots and appear in them. |
|
 to the WRENCH page
|
|
 Replace rusted or frayed cables and cracked or corroded housing by removing
the cable end cap, loosening the anchor bolt with a wrench, and removing
the bad cable from the housing (if applicable).
Replace rusted or frayed cables and cracked or corroded housing by removing
the cable end cap, loosening the anchor bolt with a wrench, and removing
the bad cable from the housing (if applicable). 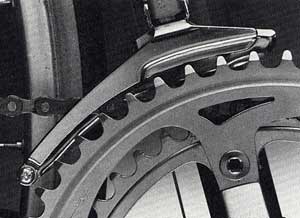
 Test your work by shifting repeatedly. Move the lever forcefully to stretch
the cable, then shift to the smallest ring and check cable slack (photo).
Remove slack if necessary as described in step 5.
Test your work by shifting repeatedly. Move the lever forcefully to stretch
the cable, then shift to the smallest ring and check cable slack (photo).
Remove slack if necessary as described in step 5.