![]()
As long
as you ride a well-maintained bicycle, serious breakdowns should be pretty
rare. Out on the road or trail you’ll mostly be repairing the occasional
flat tire because it’s hard to avoid every piece of glass, and those
rocks and potholes out on the trails. But other than that, it’s
amazing how long a maintained bicycle will run trouble-free.
Still, it’s smart to be prepared for mechanical emergencies so that
you never get stranded and have to walk home. And, by putting together
and carrying a small and simple bicycle repair tool kit you’ll be
able to fix just about anything that could go wrong. Obviously, if you
want, you can put together a large comprehensive repair kit and carry
that. It makes sense for an extended multi-day tour where you might have
to deal with problems with a variety of different bicycles.
For everyday riding, though, where you only need to keep the bike you're
on going, every additional ounce in your tool kit is more weight you have
to pedal up and down hills, so usually, the smaller and more efficient
the tool kit you carry is, the better. This holds true even more if this
is the repair kit you’re carrying as you go for a new personal record
on your local century ride or attempt to win the Sea
Otter cross-country race, for example.
A small everyday kit like this can be carried in a seat bag or trunk bag
on your rear rack or even in a backpack, a pocket or a hydration pack.
Just be sure to bring your tool kit along every time so you don’t
leave your all-important tools and spares at home where they won’t
do you any good. That can happen if it’s in your hydration pack,
which you may not bring on every ride. If the kit’s in your seat
bag strapped beneath your seat, it’ll be there when you need it.
If you have several bikes, a good practice is to have a kit on every bicycle.
It’s actually fairly surprising how few tools you can get away with in your repair kit. I recommend carrying a pump, tire levers, spare tube, patch kit, tire boot, a bicycle mini-tool (sometimes called a multi-tool or all-in-one) and a repair link for your chain. You can get by with less, but this kit makes it relatively easy to repair the common problems you’re likely to run into on the road and trail. Keep reading to learn more about each of the tools.
Pump
The majority of the tools in your take-along bicycle repair tool kit are
for fixing the most common repair, a flat tire, 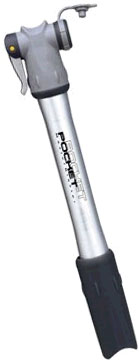 and
the most important tool may be the pump. Get one that’s right for
your bicycle, one that works well and one you like. If you’re not
sure, ask your riding pals what they recommend or ask your local bicycle
shop. The pump must fit the valves (Schrader
or Presta) on the bike you plan to use it with. Usually the pump head
can be converted to fit your valve type, but check to make sure and then
convert the head to match your valve so you don’t forget to do this
and get stuck on the side of the road with a pump that doesn’t.
If you ask at the shop when you buy the pump, they should be happy to
convert the pump head as needed to fit your valve.
and
the most important tool may be the pump. Get one that’s right for
your bicycle, one that works well and one you like. If you’re not
sure, ask your riding pals what they recommend or ask your local bicycle
shop. The pump must fit the valves (Schrader
or Presta) on the bike you plan to use it with. Usually the pump head
can be converted to fit your valve type, but check to make sure and then
convert the head to match your valve so you don’t forget to do this
and get stuck on the side of the road with a pump that doesn’t.
If you ask at the shop when you buy the pump, they should be happy to
convert the pump head as needed to fit your valve.
If you’re not sure how to use the pump, also ask the shop to give
you a demonstration. Also, you’ll want to mount the pump on your
bike frame, or tuck it in your pack if you prefer to carry it that way.
Manufacturers come out with new lines of pumps every year so it’s
hard to recommend any particular model. I’ve have had excellent
luck with pumps made by Blackburn, Crank Brothers, Planet Bike, Silca,
Specialized, Topeak, Zefal and more. If you ask at your local bike shop
they’re sure to have a good selection and can show you the differences
and recommend their current favorites. Shown is one I like a lot made
by Topeak.
You might see CO2 pumps, which use compressed
CO2 in small cartridges to inflate tires quickly. The advantages of
this type of pump are ease of use since they inflate tires almost immediately.
Plus, because they’re so small they can be carried anywhere, even
in a small pocket. The disadvantage is having to purchase cartridges and
always have one on hand. Plus, using this type of pump in frigid weather
can prove problematic as the CO2 super cools the valve when it blasts
the CO2 in. Cold weather increases this effect and the pump can actually
freeze to the valve and be nearly impossible to remove until you warm
it up. My preference is a regular pump, which always works and doesn't
require any additional parts to do its job (no cartridges to buy).
Another consideration is whether to use a frame-fit pump or a mini-pump.
Frame-fits are typically used on bicycles with standard frames. They're
spring loaded to fit snugly between 2 frame tubes so you can carry them
without any clips. They’re also on the long side, which means a
little more pumping power and faster inflation, making them ideal for
high-pressure road tires. Here's the classic Zefal
HPX frame-fit pump.
Mini-pumps are ideal for suspension mountain bikes that have complicated
frames with limited pump mounting options. The minis typically come with
mounting clips that attach to the water bottle screws allowing the pump
to ride right next to the bottle. Or, you can tuck the mini in your hydration
pack, too. It takes more strokes to inflate tires with a mini-pump, however
a good mini will do the job just fine, plus the beefy nature of mountain
bike tires usually means reduced risk of flats so you’re less likely
to need your pump. Topeak's
Mini Morph inflates well and has other nice features.
Tire Levers
 When you get a flat, you need
to remove the tire and replace the tube (or patch it) to fix it. While,
with a little practice you can remove tires
with only your hands, tire levers ease tire removal by giving you
a mechanical advantage. Also, if it’s cold and your hands get numb,
you might not be able to remove the tire by hand and will need the assist
of the tire levers.
When you get a flat, you need
to remove the tire and replace the tube (or patch it) to fix it. While,
with a little practice you can remove tires
with only your hands, tire levers ease tire removal by giving you
a mechanical advantage. Also, if it’s cold and your hands get numb,
you might not be able to remove the tire by hand and will need the assist
of the tire levers.
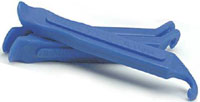
Tire levers usually come in sets of 3. To use, you let all the remaining
air out of the tire and then slip a lever under the edge of the tire (called
the bead) and pull to start prying the tire off at that point. Tire levers
usually have a thin curved end that fits under the tire and a hook on
the other end that you can place on a spoke to hold the lever in place.
Then you insert another lever about 6 inches away and pry a little more
of the tire off. And, repeat with the last lever, and the tire should
be ready to be pulled off by hand letting you get at, remove and replace
the tube. Here's Park
Tool's tire lever set shown.
Tire levers are NOT usually needed for installing tires. You should try
to always only use your hands for that.
Because, if you use the levers there’s a risk that you’ll
pinch and puncture the tube again causing a very frustrating second flat.
However, in
the event that your run into a stubbornly tight tire that seemingly refuses
to go onto the wheel, there is a tool to get the job done. It's Kool
Stop's Tire Jack and it lets you safely pry the tire onto the rim
(it's a little big for taking along on rides, though).
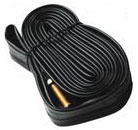
Spare Tube
Carry one that’s the same as what’s on your bike: match the
valve type and length and
the tube size. If you’re not sure, bring your bike into the bike
shop when you buy your spare tube. They’ll be able to tell what
size tube you need by looking at your tires and wheels.
The valve must be the same type or it might not fit in your rim and your
pump might not be able to inflate it. And, the size must match or it might
not fit correctly. Match the diameter (for example 26 inch or 700c) and
the width (for example, 1.5 inch or 25c). If you can’t match the
exact width, get a tube that’s slightly narrower, such as 23c instead
of 25c. Tubes stretch so it won’t cause any problems. However, if
you make the mistake of getting too wide a tube, such as a 28c instead
of the 25c, it can make it significantly harder to install the tire and
tube, so don’t make that mistake.
The other consideration is valve length. With so many aero rims and wheels
on bicycles today, the valve on your spare tube has to be long enough
to reach through the rim and extend far enough for you to be able to inflate
it with your take-along pump. So, be sure to match the valve length, too.
Or, in some cases you might even need a valve
extender, a small tool that screws onto Presta valves making them
longer.
Patch Kit
These are used for patching
tubes. If you’re lucky, you’ll never have more than one
flat tire while riding and you won’t ever use your patch kit on
the road, but only at home when patching popped tubes in your shop or
garage so that you can put them back in service again.

But, if you carry a patch
kit, you’ll be ready on that day that you find that your spare
still has a hole in it because you forgot to patch it. Or, if you’re
unlucky enough to fix a flat on the trail and then puncture the new tube
because something sharp was hiding in the tire. When that happens, you’ll
be glad you have your patch kit.
There are glueless patch
kits today with which you simply find the hole, rough the surface
of the tube and then stick on the patch, no gluing or waiting for the
glue to dry is required. These glueless kits work fine on low-pressure
tires, such as mountain bike models. For road tires, which are high pressure,
I recommend sticking with a regular patch kit. With these you must find
the hole, mark it, scuff up the area at the hole, apply glue, let it dry
thoroughly and then install the patch. The advantage of the regular patch
kit is that it is a permanent repair and can handle even the highest pressures.
TIP: When using the glue in these patch kits be sure
to roll the tube from the bottom to remove any air and ensure the glue
tube only contains glue when you screw on the top. Otherwise the glue
will dry out and there won't be any the next time.
Tire Boot
A tire “boot”
is a patch for tires. It’s used when you run over a piece of
glass or some debris that gashes your tire. When this happens it usually
ruins the tube. And, if you’re not careful, when you install your
spare tube and inflate the tire the tube will expand out of the gash in
the tire and explode making a surprisingly loud ka-pow, and scaring the
daylights out of you. It might even happen when you’re riding again
thinking that you just fixed your flat, which can be quite the revolting
development. It’s why you should always carefully inspect tires
after flats, and why always having a tire boot in your repair kit is such
a great idea.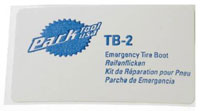
If you suffer a tire cut like this and you have a tire boot, the repair
is as easy as adhering the tire patch over the cut on the inside of the
tire. When you install the tire and tube, the tube pushes against the
boot and the boot prevents the tube from expanding through the hole. The
photo shows Park Tool’s tire boot, which is a handy one to carry.
It’s the right size for most cuts, is self adhering and made of
a thin, durable material.
TIP: If you don’t have one of these, you can use
paper money, small squares cut from canvas, denim or sailcloth that you
prepare ahead of time, and tuck in your seat bag, or even something you
find on the side of the road. We once got away with using a piece of aluminum
we tore from a Coke can, believe it or not. I’ve also heard of people
stuffing other trash in the tire and even cutting patches out of their
clothing, though, with the price of cycling clothing, I can’t recommend
that.
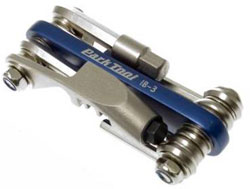 Mini Tool
A good mini tool
takes up little space yet contains all the important tools you might need
on the road including common Allen wrenches, such as a 3, 4, 5, 7 and
8mm, a torx wrench (if you’re using disc brakes), regular and Philips
screwdrivers and a chain tool. I recommend always carrying one that includes
a chain tool because as we’ve gone from 6-speed to 10-speed drivetrains,
chains have become narrower and more delicate. As long as you have a chain
tool along, you can get going again.
There are all kinds of different mini-tools available from many popular
manufacturers and the tools and features vary. Look for one that has the
tools you need for the bikes you’re taking care of on rides. For
example, you’ll want an 8mm Allen wrench if your bicycles are equipped
with crankarms held on by 8mm bolts. You may not need some of the extras
these tools often include, such as bottle openers, knife blades, etc.,
though only you can judge for sure what you might encounter on your rides.
And you should select the one that makes the most sense for you.
Chain Master Link
As long as you have a mini-tool that includes a chain tool, you can fix
a broken chain, but it can be a messy and tricky job if the damage is
bad enough. So, I always carry something that makes chain repair much
easier called a repair or master link. I like to think of this handy device
as a chain patch because of how easy it is to fix broken chains with it
the same way a tube or tire patch makes fixing those thing easy. When
you go shopping for these, every manufacturer has their own name for theirs
so you might hear, Powerlink or Connex
link or Quick Link or even master link. Just tell the shop that you’re
looking for a special repair link for a derailleur chain so they don’t
give you one for a coaster-brake-type bicycle, which won’t work
on you bike.
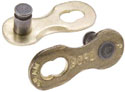
It’s also important to get one that fits your chain. If you have
a 10-speed drivetrain, you need a 10-speed
repair link, and so on. You can see from the picture that these links
come in 2 parts and simply snap together. Each has its own special installation
instructions so be sure to read them when you get the link or ask your
bicycle shop for advice to ensure you know how to use it.
With one of these master links in your repair kit, should you or one of
your riding buddies break a chain, you simply remove the broken chain
parts and reconnect the ends of the chain with the repair link and the
bike is good to go.
TIP: The most fun I have with these is fixing other
people’s bikes that I encounter on the trail. They’re usually
hiking out of the woods unhappy about the long walk ahead and their broken
bike. And, when I get them pedaling again with this simple little part
it really makes their day.
Spoke Wrench
Most good mini-tools include spoke wrenches, but I like to carry a quality
spoke wrench because they’re easier to use. The minis usually
integrate their spoke wrenches into other tools making it more difficult
to true wheels 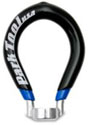 because
the body of the tool gets in the way. Sometimes the spoke wrenches on
these tools don't fit on the spoke nipples quite properly, either, which
can increase the chances of rounding and damaging the nipples.
because
the body of the tool gets in the way. Sometimes the spoke wrenches on
these tools don't fit on the spoke nipples quite properly, either, which
can increase the chances of rounding and damaging the nipples.
So, by carrying my own, I know I’ll be able to fix my, or my friend’s
wheel easily and accurately should we tweak a wheel. Spoke wrenches are
small, so it’s easy to tuck one in my kit. And, in the event of
a seriously pretzeled wheel I know I have the right tool to get us home
when all looks lost.
TIP:
If you're riding with people on lots of different type bicycles, a great
takealong is Hozan's
Combination Spoke Wrench, which features six spoke sizes so you'll
be able to rescue everyone.
Other Goodies
The items above sum up what I carry, however, you might like to bring
some waterless hand cleaner and a small rag, too. If so, a good way to
carry the hand cleaner is in a 35mm-film container—if you can even
find those anymore. If so, the container makes a handy place to wrap a
little duct tape. That’ll make a nice tire boot, too.
