BICYCLE REPAIR
|
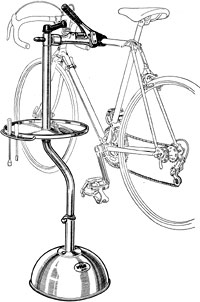 |
| Equipment: Round up the following:
|
|
You needn’t remove external end caps or bar-end shift levers. If the bar tape is not supplied in halves, unroll and cut it in 2 equal pieces. Remove a 3-inch length from each. (Sometimes these short pieces are provided in the package.) If you're installing new ones, place your new rubber hoods in hot water to soften them for easier installation. |
Roll the brake hoods |
Double check the cable routing |
Bar-end shifter cables should travel underneath the bottom portions of the bars and partway up the front side of the bends before exiting and curving to the down-tube cable guide. Secure the cables with transparent tape if necessary. |
 External end caps: if they were removed, install the caps
and secure them with transparent tape (just visible in the photo).
Affix another piece of tape to the end of non-adhesive bar tape and tape
it to the end cap (photo). Wind either type of tape around
the bottom of the bar, stretching it tight as you go (don't pull too hard
or you may break the tape and have to buy new tape if it's now too short).
Overlap each turn of bar tape about 1/4 inch.
External end caps: if they were removed, install the caps
and secure them with transparent tape (just visible in the photo).
Affix another piece of tape to the end of non-adhesive bar tape and tape
it to the end cap (photo). Wind either type of tape around
the bottom of the bar, stretching it tight as you go (don't pull too hard
or you may break the tape and have to buy new tape if it's now too short).
Overlap each turn of bar tape about 1/4 inch. |
If necessary, install the end caps |
Internal end plugs hold the tape in place |
Tuck the overlapping portion of bar tape into the end of the handlebar and push the plug in to keep the tape in place and nice and neat (photo). Push the plug in with your palm or tap it home with a small mallet. Tighten internal-expanding handlebar plugs with a screwdriver. |
|
At the lever, wrap in a figure-8 pattern by going over the top of the lever, behind the bar, under the lever, behind the bar, over the lever, behind the bar, and under one final time (photo). This will hide the clamp and surround the lever. The trick to preventing wrinkles is keeping the tape taught as you wind (the slack shown in the photo is just so you can see the way it’s wrapped). |
Attach the 3-inch pieces |
Continue wrapping to the top |
 Continue
wrapping until you reach the thicker, center part of the bar top
(about 1 1/2 inches from the stem (photo). If you are using
a bolt-on aero bar (sometimes called clip-on aero bars), end the taping
sooner to accommodate it. Cut the bar tape so its end is out of sight under
the bar, and secure it with plastic tape or the logo finishing tape supplied
with the handlebar tape. Continue
wrapping until you reach the thicker, center part of the bar top
(about 1 1/2 inches from the stem (photo). If you are using
a bolt-on aero bar (sometimes called clip-on aero bars), end the taping
sooner to accommodate it. Cut the bar tape so its end is out of sight under
the bar, and secure it with plastic tape or the logo finishing tape supplied
with the handlebar tape. |
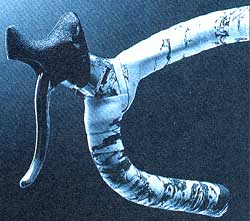
 Unroll
the brake hoods. If you are installing new ones, note if there
is a left and right one (they might be marked L and R). While still wet,
slide them over the lever top and body (photo). If you
have exposed cables (non-aero levers) you must detach the cables from the
brake levers before installing new hoods. Unroll
the brake hoods. If you are installing new ones, note if there
is a left and right one (they might be marked L and R). While still wet,
slide them over the lever top and body (photo). If you
have exposed cables (non-aero levers) you must detach the cables from the
brake levers before installing new hoods. |
Unroll the hoods or slip on new ones |
|
This article
is based on one I wrote for the February 1992 issue of Bicycling Magazine.
The photos are by Mel Lindstrom. I set up the shots. |
|
 to the WRENCH page
|
|
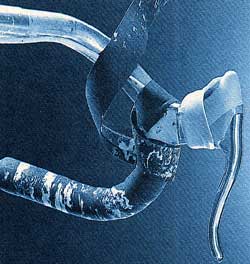
 Roll the brake hoods away from the bar (photo)
or, if they’re worn out and you have replacements, cut them off.
Carefully pry internal handlebar end caps free with a small screwdriver.
(First loosen the center screws on internal-expanding types.) Remove the
finishing tape (at the top of the handlebars) and then you can unwind
the old bar tape.
Roll the brake hoods away from the bar (photo)
or, if they’re worn out and you have replacements, cut them off.
Carefully pry internal handlebar end caps free with a small screwdriver.
(First loosen the center screws on internal-expanding types.) Remove the
finishing tape (at the top of the handlebars) and then you can unwind
the old bar tape. 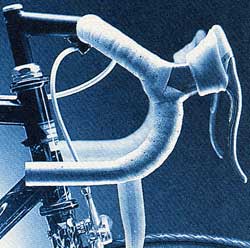
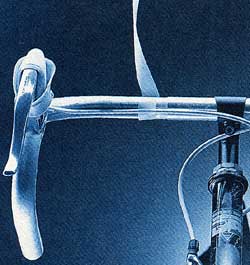
 If you have aero levers or bar-end shifters, double-check
the cable routing. For aero levers, the housing should travel in a smooth,
gradual bend in front of the upper portion of the bar (photo).
This way it’s out of sight and fits easily in your grip when holding
the bar tops. Route
If you have aero levers or bar-end shifters, double-check
the cable routing. For aero levers, the housing should travel in a smooth,
gradual bend in front of the upper portion of the bar (photo).
This way it’s out of sight and fits easily in your grip when holding
the bar tops. Route 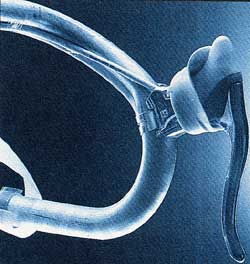

 Internal
end plugs: Tape the end of non-adhesive bar tape to the handlebar
end. Position either type of bar tape so that most of its width is hanging
over the edge. Wind it around the bottom of the bar, stretching it tight
as you go (don't pull too hard or you may break the tape and have to
buy new tape if it's now too short). Overlap each turn about 1/4 inch.
Internal
end plugs: Tape the end of non-adhesive bar tape to the handlebar
end. Position either type of bar tape so that most of its width is hanging
over the edge. Wind it around the bottom of the bar, stretching it tight
as you go (don't pull too hard or you may break the tape and have to
buy new tape if it's now too short). Overlap each turn about 1/4 inch.
 Attach the 3-inch pieces of bar tape behind the bars
so they cover the brake lever mounting bands. (Use transparent tape
if necessary to secure the pieces.) Continue wrapping the bar, stretching
it tight as you go (but be careful so you don't break it).
Attach the 3-inch pieces of bar tape behind the bars
so they cover the brake lever mounting bands. (Use transparent tape
if necessary to secure the pieces.) Continue wrapping the bar, stretching
it tight as you go (but be careful so you don't break it).