|
Did you ever look at something you’ve owned for
a while, say a car, something you like or liked a lot, and wonder
how it got to where it is today? You look at that car that served
you all these years and you remember the ordeal haggling on price
at the dealership; you recall the gleaming paint and the awesome acceleration
during the first years of ownership; the pride of showing off your
new wheels.
Now, you wonder where all those dings in the body came from; how you
could have let the sun crack the dashboard; why the carpet wore through;
you long for the days when she pulled away from lights with power
to spare instead of sputtering and stuttering. You might think to
yourself, “Boy, I wish I’d have taken better care of that
car because she sure was a beaut when new.”
You might even have thoughts like these when you buy something new
and promise yourself this time that you’re not going to let things
get away from you; that this time, you’ll take steps to keep
this possession in pristine shape forever.
Well, if it’s a bicycle you’re thinking about, I can help.
I might not be able to restore it for you if it’s been abused.
But I can give you some easily done basic bicycle care steps that’ll
rejuvenate most well-ridden two-wheelers. And the same tips can keep
a new bike running and looking new for as long as you want.
Pump It Up
 Probably,
the number one reason bikes fall apart is because people ignore the
tires. Here’s what happens: Bicycle tires have very little air
in them. And bicycle tubes, which are made of butyl rubber, are porous
enough to allow air to seep out. Probably,
the number one reason bikes fall apart is because people ignore the
tires. Here’s what happens: Bicycle tires have very little air
in them. And bicycle tubes, which are made of butyl rubber, are porous
enough to allow air to seep out.
The result is tires softening over a period of about a week for road
bikes and about a month for mountain bikes (though it depends some
on tire size).
When the tires get soft, bad things happen. Some folks decide to stop
riding the bike because they think they have flat
tires and they put off getting the flat fixed because it means
loading the bike in the car and dragging it down to the bike shop.
Others (and this is more common) don’t realize that the tires
have softened and ride the bike anyway. Unfortunately, if you ride
with soft tires, there’s a risk of rim and tube or tire damage
should you hit a pothole or rock. The impact compresses the tire,
allowing the object to smack into the rim, possibly bending the rim
and puncturing the tube. Besides this, it’s much harder to pedal
a bike with soft tires, and the tires wear quicker when used underinflated.
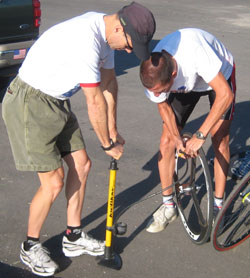
These reasons ought to be enough to convince you that it’s best
to regularly inflate the tires. Road bikes should be checked before
every ride (photo) and mountain bikes at least weekly. Use a good
pump that has a built-in gauge and follow the manufacturer’s
recommended pressure, which is written on the tire sidewalls. Here’s
the great Pedro's
Super Prestige pump that I own and recommend.
 Lube
It or Lose It Lube
It or Lose It
A bicycle is made up of a bunch of moving metal parts, many of which
are meshing with each other. In order to keep these parts from grinding
each other to dust as you pedal merrily along, they should be lubricated.
Spinning parts containing bearings, such as the wheels, pedals, bottom
bracket (what the crankset is mounted to), and headset (the mechanism
that connects the fork to the frame and allows steering), come from
the manufacturer packed with grease.
About once a year, these components should be dismantled, checked
and regreased. But, because special tools are needed and the work
is required only occasionally, you may prefer to leave this job to
a bike shop mechanic.
What you can do quite easily is lubricate the chain and pivot points
on the brakes and derailleurs. Use a light lubricant such as Tri-Flow
and don’t apply too much, because that will only attract dirt
and grit that can actually accelerate parts wear.
You can tell when a chain needs lube,
because the links will appear bright and shiny, and when pedaling
you’ll hear squeaking. But only apply enough lube to put a light
coat on the chain (about one drop per link). Any more than that and
grime and gunk will build up. One good technique is to apply the lube
(pedal backwards while the bike is leaning against a wall and put
some paper down to catch drips), let it sit a bit and then wipe off
the excess.
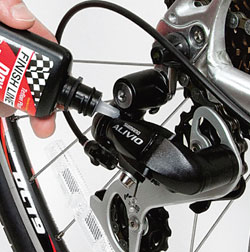
When I say lube pivots, I mean the places on the derailleurs and brakes
where things move. For example, on a sidepull brake (as found on most
road bikes), the brake pivots on bolts and you can apply a couple
drops of lube at these points. Don’t get any lube on the brake
pads!
For derailleurs apply the lube where the body of the derailleur moves
(photo). Here too, be sure to wipe off the excess.
The company Finish Line offers a nice product brochure that includes
tips
on bicycle lubrication.
Clipless pedals often develop creaking
noises. Sometimes this comes from the shoes rubbing on the pedals.
For metal pedals and cleats, a few drops of medium weight oil on the
cleats will quiet the noise. For plastic cleats, you can try a wax
furniture spray or even better is Finish
Line's Pedal and Cleat Dry Film Lubricant. It dries fast so it
won't stain your carpet if you walk into your living room in your
cycling shoes.
 Keep
It Clean Keep
It Clean
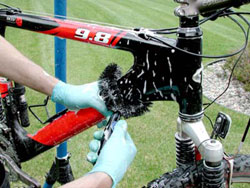
Mountain bikers, especially those who ride in the mud, should keep
a cleaning kit in the corner of the garage
ready for use at ride’s end. All that’s needed is a bucket
with some sponges and dishwashing detergent and a nearby hose.
When you return from a ride, prop the bike up and spray off the majority
of the mud and muck with the hose. It’s crucial to not blast
the water sideways at the bike. Doing so may force the water into
the pedals, hubs and bottom bracket, which may compromise the grease
and bearings inside these components. Instead, spray water only from
above and don’t ever direct it toward greased parts.
Once you’ve knocked off most of the dirt, fill the bucket with
warm water and enough detergent to raise some suds and go to work
on the bike with the sponge. This cleaning
brush kit by Finish Line makes the job a lot easier. When you’ve
scrubbed the bike fully, rinse off the soap by dribbling water from
above.
With a little practice, you ought to be able to turn a filthy mud
monster into a sparkling wonder in about 15 minutes. And it’ll
save the paint finish and help keep the parts running nicely because
you’ve gotten rid of all the dirt and grime. Don’t forget
though to relube things after the bath because if you leave the parts
wet with water, they’ll rust.
Tips: to quickly clean bikes that aren’t too
dirty, apply spray furniture polish to a rag and wipe your bicycle
clean with it. Also see Park
Tool’s bike washing and cleaning how-to.
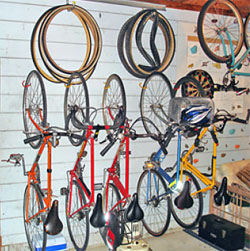 Store
It Store
It
I tell everyone to store bike(s) inside. It’s the best way to
keep them running and looking like new. And it doesn’t take much
in the way of space or supplies. The only item needed is a bike
hook. These are shaped like question marks and coated with vinyl
so as not to scratch the wheel when you hang the bike on the hook.
Install the hook in a stud in a wall or a rafter or beam; anywhere
where the bike can hang vertically is fine. I’ve seen bikes stored
in stairwells, bathrooms, bedrooms—anyplace you can find dead
space is fine. It’s also possible to use two hooks and hang the
bike horizontally, one wheel on either hook.
It’s not the hanging that saves the bike. It’s keeping the
bike out of the environment. You might think it’s okay to leave
it on a porch or deck as long as there’s a roof covering it.
Don’t make that mistake. Moisture in the air will attack the
metal parts on the bike. Especially caustic are areas close to the
ocean where the salt in the air will quickly corrode components.
You can avoid these hazards by simply storing the bike indoors. If
you don’t like the idea of bike hooks in your walls or rafters,
consider a bike storage
display stand. These provide convenient storage while displaying
the bike like a work of art.
Baby It
Bikes are tough but you greatly increase the chance of problems and
rapid wear if you beat them. It’s much better and you’ll
enjoy the riding more, if you learn how to ride smart to protect the
bike. The key skill is to learn to constantly scan the road or trail
ahead and try to avoid the things that ruin a bike such as potholes,
ruts, roots, rocks, glass, oil spots, etc.
Some of these things can’t be avoided. And riding off road, you
have to ride over obstacles all the time. But there are ways to do
it, and still save the bike. Learn to get up off the seat and bend
your arms and legs the same way a jockey sits on a racehorse. If you
do this every time you spot objects you can’t ride around, you’ll
protect the frame, fork, wheels and components.
If you enjoy jumping a mountain bike, learn to do so professionally.
Good jumpers rarely land hard. They work on their technique so they
land softly; you barely hear the impact. Ditto for riding wheelies
or hopping over logs and things. The lighter your technique the better
chance your bike won’t take a beating. It’ll save you money
in replacement parts, greatly reduce the chance of injury, and ensure
that your bike keeps running trouble free.
Inspect It
All machines wear, and a bike is no different. Expect changes in your
equipment if you ride a lot and prevent failures by staying on top
of things with weekly or monthly inspections (depending on how much
you ride).
Scrutinize the brake pads to see if they’ve
worn out (most have grooves in them; when the grooves disappear, replace
the pads). When the pads shrink from use, you not only lose braking
power, the chances of the pad diving into the spokes or striking the
tire and popping it increase.
Operate the brake and shift lever and look closely at all four cables
both at the levers and at the derailleurs and brakes. Also inspect
along the frame. If you spot any signs of fraying or rusting or even
if you see cracking in the cable housing sections, have the cable
and housing replaced by a shop. That’s much better than getting
stranded miles from home with no brakes or a bike stuck in a super-hard-to-pedal
gear.
Check the tightness of key component by putting a wrench on every
important bolt and snugging slightly to see if it has loosened. Check
the seat and seatpost bolts; the wheel quick releases; the stem and
handlebar bolts; the brake and shift lever bolts; wiggle the spokes
to feel for loose ones; tighten clipless pedal screws; and don’t
forget bolts holding on accessories, which can loosen too.

to the WRENCH page
|
 Place a piece of electrical
tape on the right chainstay (the frame tube that runs from the bottom
bracket to the dropout where the rear derailleur is attached). The
chain hits this tube frequently. Tape will prevent paint chips and
help silence the noise. To
Place a piece of electrical
tape on the right chainstay (the frame tube that runs from the bottom
bracket to the dropout where the rear derailleur is attached). The
chain hits this tube frequently. Tape will prevent paint chips and
help silence the noise. To