I
get lots of questions about bicycle noises because they drive cyclists nuts, like my teammate in the
photo who I’m (green shirt) helping find a noise before his
race in the Watsonville Criterium.
He had an annoying clunk/click noise while warming up. I found that
one of his clipless pedal cleat tension screws had loosened. I tightened
it to stop the noise.
To help you find your noises, I’ve put together the following
guide organized by bike-noise category.
Please keep in mind
that one person’s click is the next person’s creak, so
I recommend perusing the entire list to find your problem and a solution.
Ideally, this guide would be short and easy to follow, yet there are
lots of noises you might encounter and to keep this comprehensive,
I regularly update it with new noises and solutions. To make it a
little easier to find things, noise-causers and problems are underlined
(or in bold in the Your
noises and solutions section at the bottom of the page)
and the recommended solutions are in red
bold.
TIP: Most browsers have a Find function. For example,
in Internet Explorer, click Edit and then Find (on this page), type
the word or phrase that defines your bicycle noise, then press Enter,
and Explorer will find it on this page. You can also search for the
bicycle component you think is making
the noise, for example, bottom bracket, pedals, wheels, etc.
Also, please let
me know if you’ve discovered a new noise or solution and I'll
add it to the page and credit you. And, as we discover and quiet the
weird and often mysterious bike noises that stump even experts this
page has become an awesome resource and continues to be up-to-date with
the latest components.
If you'd like say thanks for helping with your bicycle repair and
help me keep this site going, the Donate button takes you to PayPal
where you can make a secure donation of any amount. Thank you!
Most of your
noises and solutions are at the bottom of the page
and some are found under the type of noise they are, in the body of
this article. Credit is given at the end of the tip. Many thanks to
my regular readers, the readers of RoadBikeRider,
and ace mechanic Anthony Alsberg who have offered many excellent noises
and cures, and helped ensure that every ride is a quiet ride!
Before jumping into the noises and solutions, a good starting
point with all bike noises is isolating where it’s
coming from by substituting different parts. For example, if you think
the noise is coming from a wheel, install a different one (ask to
borrow a friend’s if you don’t have a spare) and see if
the noise goes away. If so, you know your noise is wheel related,
which will make it much easier to find it. You can use the same technique
with any part that can be replaced, such as your pedals, shoes, seat
and post, handlebars and stem (a tough one, but possible), and so
on.
Note
that if you can't find a solution for your bike noise on my page,
you might be able to over at my friend Dennis Struck's cycling
website so give that a try too.
To start off, here’s my video on fixing a common bike noise-maker.
And, here’s another video of mine about fixing common bicycle wheel noises.
Rattles
The most common cause is a loose headset. Play in the headset
bearings allows the fork to rattle when you ride over bumps.
Solution: Adjust the headset to remove the play and
tighten the headset so it can’t loosen again.
Almost as common are loose Presta valve nuts, the little octagonal
or knurled round rings that thread onto Presta valves. Reader John
Zalman had a valve rattle caused by a threadless valve
(no valve nut) in a slightly oversize valve hole in the rim. While
riding, the valve was vibrating and striking the side of the hole
making a rattling/clicking noise. Solution: Snug them,
but don’t overtighten or you’ll have trouble getting them
off when you need to repair a flat tire. You can also remove them.
The tires and tubes will work fine without them. And reader Dan
Butler (thanks, Dan!) suggests placing O-rings on beneath
the valve nuts to silence them and prevent water entering the rims.
John fixed his threadless valve/oversize valve hole rattle by slipping
a rubber O-ring sleeve over the bottom of the valve to prevent it
from vibrating against the rim (nice one, John!). A wrap of electrical
tape to enlarge the valve at the rim should work too.
Another common cause is loose cassette cogs, which create a
drivetrain rattle, sometimes accompanied by poor shifting.
Solution:
Feel for play by trying to move the cogs laterally with your fingers.
Use a Shimano
cassette lockring tool
and a large adjustable wrench to tighten Shimano cassettes by tightening
the lockring (photo). This also works for Campy cogs using a Campy-compatible
lockring tool
. To tighten SunTour and older Shimano models, remove the wheel, place
a chain
whip
on the smallest cog, and turn it clockwise.
Other rattle solutions: Tighten loose bottle cages,
bend cages to grip bottles more firmly, make sure seat bag
tools can’t hit each other and/or strike the seatpost,
and stuff foam helmet pads into the handle of a frame-fit pump
to silence the rebound spring.
California cyclist
Andy Beard had a rattle on his 8-speed triple road bicycle. He
says, "it happened once every crank rotation but only in the
3-4 smaller rear cogs (highest 3-4 gears) and only in the middle
chainring up front. Solution:
Upon closer inspection I discovered that my big chainring was slightly
bent near one of the pins causing the chain to rub against a pin.
It rubbed only ever so slightly, not enough to catch the chain and
produce the distinctive sound of a front shift. Straightening the
chainring solved the rattle. This one seems kind of obvious, but it
actually took quite a while to diagnose.
Squeaks
One common constant squeaker is a poorly lubricated chain.
Solution: Inspect yours. If the rollers are dry and
shiny, apply drip or spray lube. On extra dry ones it may take a while
for the substance to penetrate and silence the noise. Then keep the
chain quiet by lubing it every 2 weeks. Always wipe off the excess
to minimize sludgy build-up.
Derailleur pulleys can squeak often sounding like a bird chirping,
and you usually know it’s the pulley because the faster you
pedal, the louder and faster the pulley squeaks (although models that
say sealed on the side don’t). Solution:
Rest your bike on its side and apply a few drops of oil between the
pulleys and sideplates to silence them. Wait a few minutes for the
lube to penetrate, then wipe off any excess. Still squeaking? You’ll
need to remove them (photo), take them apart and grease each part
before reassembling with a good bike
grease.
TIP: Do one at a time since they are often dedicated
to the top or bottom position and you don’t want to get them
mixed up.
Brakes can squeak and squeal, too. This is caused by the brake
pads vibrating against the rims.
Solution: For quiet operation, pads must be in good
condition and “toed-in,”
which means that the front of the pads contacts the rim before the
rear. If the pads are several years old, replace them. If they’re
striking the rim flat, carefully adjust
them so that the front touches before the rear. Most brake pads
feature a mechanism for making this adjustment. TIP:
If your brake pads are in good shape and toed in and still squeaking,
it may be because residue has built up on the rims. Clean them with
a solvent, such as lighter fluid and then lightly sand them with medium
emery cloth to scuff up the surface of the rims and break up any rubber
deposits on the rim.
If there’s a front reflector on your bike, the brake
or gear cable housing may rub when you turn causing a squeak.
Solution: Try lightly greasing the reflector’s
edge, wrapping the offending section of housing with cloth tape or
zip-tieing the housing to the bracket loosely so you can turn without
restricting the housing.
Reader Joey Korkames from Phoenix writes: “I had new wheel quick-releases
that were the exposed-cam
style and the delrin cam-washer would squeak against the quick-release
lever surface when rolling over rougher roads (pedaling or not,
sitting or not). I tightened the thing far beyond pratical but the
brittle plastic and polished-aluminum interface would just always
make squeaks with enough vibration applied to it. Solution:
I didn’t think to try greasing the washer instead of oiling
it at the time, but just outright replaced it with a conventional
two-piece quick-release and the squeaking was gone!”
Clunks If
you hear or feel a clunk when pedaling, it’s probably
caused by a loose bottom bracket or pedal. Solution: Check the
latter with a pedal
wrench
, tightening both pedals. The right one is turned clockwise to tighten,
the left is turned counterclockwise (more
pedal information here). If you ride clipless pedals, a loose
fit between the pedal and cleat can cause clunks when you're pedaling.
Look for a cleat tensioning screw on the pedal and tighten it to remove
the looseness.
To adjust the bottom bracket, remove the crankarms and, with the appropriate
tools for your type of bottom bracket (tools for cup-and-cone type
shown), make sure it’s held fast in the frame by tightening
the cups and/or adjusting the bearings (as required for your set-up).
Another funny clunk when pedaling is caused by a pump that’s
brushing the crankarm on each pedal stroke (usually it’s the
head of the pump because it protrudes a bit). Pumps are often made
of plastic so you might not think it can cause a noise, but it can. Solution: Simply reposition
the pump so there’s more clearance.
Reader Pascal Golay reports that, "I recently
had an intermittent clunk develop on my bike and it turned
out to be the axle on my rear wheel (Mavic Ksyrium) backing out very
slightly. Solution:
A 5mm allen key in each end was enough to squeeze it up again but
it took a long time to locate. The symptom was clunking with the pedal
strokes, louder and clunkier out of the saddle, and occasionally not
there at all under the same conditions. I felt it throughout the bike
so it was hard to locate."
And Brian Clarke adds, "I had a clunk that would take place
when riding over bumps. My headest was loose but even after tightening
the headset the noise remained. Solution:
Turns out that my front wheel was not tight (although
it still stayed straight). The noise was the hub becoming slightly
detached then hitting the front fork/dropout. Tightening the wheel
took care of it."
A reader named "Jeremy"
(last name not provided), writes, "I want to add my experience
to your noises reference. I had a loud clunk/pop happening when
I applied strong force to the pedal crankarm. Solution:
Ended up being a slightly bent link in my chain. Not bad enough to
effect shifting and never dropped the chain. Didn’t even jump
or skip. Took me several attempts to figure this one out. Thanks,
J=" Thank you, Jeremy!
Skipping Skipping is what happens where your drivetrain has a problem
and under hard pedaling, you experience a sudden jerk forward at the
pedals as if the chain “skipped” up over the cog and then
settled down again. This usually is accompanied by a sort of “crack”
or “bang” sound as the chain or cog lets go, and it can
surprise you and even cause a crash if you’re not careful. Solution:
First crouch down next to the drivetrain side of the bike and pedal
backwards looking for a stiff link because stiff links can cause this
problem and they’re relatively easy to fix. TIP:
If you have a stiff link, you’ll experience skipping in all
the gear combinations. You will be able to spot a stiff link as you
pedal backwards with your hand and watch the chain pass through the
rear derailleur pulleys. A stiff link won’t be able to curve
to follow the contours of the pulleys so you’ll see it trip
as it goes through (photo). If you spot the stiff link, move the chain
so the bad link is in the middle of the chainstay (the lower frame
tube between the crank and rear wheel) and then flex the chain sideways
at the link to free it. Don't flex it too hard or you'll bend it and
you don't want bends in your chain. If flexing it doesn't work, try
using a chain
tool
and pressing the chain pin right at the stiff link(s) in a slight
amount from the front side of the chain and then moving the tool to
the backside and pushing it back. Moving the pin like this can make
more clearance between the sideplates and free a stiff link. Sometimes stiff links are caused by corrosion. If you see lots
of rust, flexing the link and pushing the pin usually won’t
free the stiff links. Solution: You can try
applying a penetrating
lube
and waiting a while to see if it does the trick, but if that doesn't
work, you will probably need a new chain. If the chain is otherwise
in good condition, you can also replace the stiff links with new links.
Just be sure that the new links match your chain (same width). Skipping is also caused by worn-out chains and cassettes/freewheels.
If this is the case, your bike will only skip in one or a few cogs,
not all of them. Solution: You should
replace the cassette/freewheel and/or chain (only if the chain is
worn out or damaged). Besides stopping the skipping and noise, your
bike will start shifting well again, too. TIP: Though
rarer than skipping caused by worn cassette cogs and chain issues,
skipping can occur when chainrings are worn out, too.
Solution: Replace the chainring.
Clicks/Clicking Over time wheels can make a clicking noise.
Solution: This happens because where the spokes cross
each other, they touch. Over time, the spokes wear slightly, get very
dry and start to click as you roll down the road and weigh the spokes
making them move slightly and click, click, click. To stop the noise,
apply a drop of oil
at each spoke intersection. Then go around and squeeze pairs of spokes
with your hands, which will let the oil work between the spokes. Finish
by wiping off any excess lube. TIP: You may need
to do this once a year or so to keep the clicking at bay.
Over time wheels can make a clicking noise #2.
Reader Simon Westlake, reports, “I recently had a clicking problem
on a Pro Lite Como wheelset that I could not solve. Initially, I thought
it was where the bladed spokes cross over each other. I've had this
problem before, but not for a while, as my recent wheels have been
spoked radially. So I lubricated each crossover point and was amazed
that the clicking persisted. I then gave each nipple, both where the
nipple enters the rim and where the spoke enters the nipple, a good
spray with Inox. This didn't solve the problem either. As the clicking
got worse, I was able to rule out possible causes other than the suspected
rear wheel. For instance, Initially it just occurred under load in
any gear out of the saddle. Then it started clicking when I was in
the saddle. I even considered that it could be the headset as I have
had similar clicking from there if there is slight play caused by
insufficient tension in the threadless setup—but this stops
if you let go of the bars while pedaling, which I did but it had no
effect on the clicking.
Bottom bracket creaking is a slightly different noise and I've had
this before, but I had installed this one myself and used ridiculous
quantities of grease on the threads at the time, so I thought I could
safely rule it out as a cause.
Another common one for me and I haven't heard too many other people
reporting it, is clicking caused by dry contact between the rear dropout
surfaces and the axle/quick-release surfaces. I regularly put a small
film of oil
on the dropout
contact areas to keep this at bay, but I applied more and the clicking
persisted.
It
wasn't until the clicking got so bad that it was occurring even when
I WAS NOT EVEN PEDALING, that I realized it had to be the rear wheel.
So, the only parts that I had not lubricated was where the spokes
join the hub. I felt this was a remote chance to say the least, but
I did it anyway and the clicking continued. There were only two other
things that I thought I could do. One was to slide small pieces of
paper between the crossover points of the spokes. Even though I had
lubricated these points, the paper would rule it out for sure. I didn't
get to try this though because my next trick was to solve the problem. Solution:
As
said previously, I had flooded the spoke nipples with lube. The nipples
are slightly smaller than the rim holes and I had made sure that lube
got into this gap as well...... but maybe it wasn't enough. Maybe
it needed more. So, I removed the tire, tube and rim tape and sprayed
inox directly onto the back of the nipples inside the rim cavity.
BINGO, I had a silent bike again. For an obsessive compulsive perfectionist,
this is a very important thing. Simply riding along ignoring clicks
and creaks is not an option.
If
it weren't for the fact that the wheel started to click when I wasn't
pedaling, which enabled me to know for sure that it was the rear wheel,
I would have had the whole bike in bits - Literally. You see, I'd
already lubed the spoke nipples. I'd had the same problem with Mavic
MA33's years ago and a quick spray had solved the problem. So, I could
have been confident in ruling that area out and moved on to other
areas of the bike. It didn't come to this, but it could have. I guess
the message here is that it doesn't hurt to pursue one area and redo
lube/tightening etc. rather than randomly skip from one area to another
without fully exploring the possibilities.”
Thanks to reader Simon Westlake from
Perth, Western Australia for this tip.
Wheels can make a clicking noise #3
"A friend I train with had an unusual sound coming from his rear
wheel. It would start out as a click and then change to a harmonious
rattling vibration then disappear, only to start again 10 kilometers
further down the road. He took the bike in to the local bike shop
who over several visits replaced his chain, rear cluster, bottom bracket
bearings and head set. Still the noise continued. This was driving
him nuts and those who rode with him. Eventually he gave in to personal
pride and brought his bike over where I placed it in the workstand
and went over it with a damp rag and a torch cleaning the whole lot
and inspecting for fine cracks. After about thirty minutes I discovered
some very fine hairline cracks in his rear rim each traveling between
the spoke holes. To confirm our suspicions we fitted the bike to a
trainer (I considered a defect like this to be unsafe to continue
riding on the road; the trainer would at least support the weight
of the bike should the rim fail) and had him ride under a moderate
load and the vibrations started. Solution:
I
had him stop riding whilst I applied a little WD-40
to each rim crack. He then resumed riding on the trainer. The oil
was now lubricating the cracks and was impossible to get the bike
to vibrate as before. The rattling vibration would start when the
speed of his bike along the road matched the resonant frequency of
his bike. As his rim was considered un-repairable our solution to
this was to replace the wheel, to which my friend upgraded to a new
set of Fulcrum Race 5's.
Thanks to Aussie Ian Miles for this
nice safety tips about cracking rims!
Wheels
clicking #4 And a helpful cyclist named TJ says, "I
discovered that the intersection of 2 bladed spokes (aero spokes)
can be noisy as well. I tried lubing the cross area where they
touch and still had noise. I noticed that if I changed the twist
of the blade section (by turning the spoke slightly with an
adjustable wrench set to just slip over the spoke), I could
eliminate the noise. I just made a very slight rotation of the
spoke while squeezing the pair of spokes until the noise was
eliminated."
Thanks TJ!
Wheels clicking #5 Adds, Peder Moller, "I just fixed
a clicking wheel problem by lubricating where the spokes are
fixed to the rear hub."
Thanks, Peder!
A
crankarm that's slightly loose or inadequately lubed will make
a click
when you push on that pedal.
Solution: Tighten/or,
if that doesn’t work, remove the crankarm, lightly grease
the axle and reinstall. TIP: Most crankarms
require special tools for removal. If yours are held on by nuts
in the sides of the crankarms (usually hidden beneath dustcaps),
you can also remove the crankarms by riding the bike, BUT
you must do this very carefully to avoid damaging the crankarms.
To do it, loosen the bolts, but don't remove them. Then ride
a loop on flat ground around your neighborhood so you stay close
to home. Pedal with regular pressure. After a few laps the arms
should loosen up and you should be able to remove them by hand.
What you DON’T want to do is damage the crankarms by pedaling
on them when they're loose. So keep checking when you’re
riding to see if they are loose enough and don’t ride
too far and damage the crankarms because they’re expensive
to replace. Chainring
bolts
may loosen or be inadequately lubed and click intermittently.
Solution: Check to make
sure they’re tight. Still clicking? Try removing, greasing
and reinstalling the chainring bolts.
If you hear a longer metallic click when pushing on the right
pedal only the chainrings may be flexing allowing the chain,
for just a moment to brush against the front derailleur cage
making a metallic clicking sound.
Solution: This rubbing
noise is essentially rider error. If you pedal in a hard gear
(on the large front chainring) at a slow speed, you can easily
put too much force on the chainrings causing them to flex and
causing the chain to rub against the derailleur cage. Instead,
you should shift into an easier gear so that you can spin rather
than powering in too high a gear. This is safer for your knees
and legs and is a more efficient and effective way to ride your
bicycle that will prevent the chain rub/noise.*
*A reader named Anthony, adds, “I had this problem and
it turned out my bottom bracket was loose. I only got the rubbing
when I was on the large chainring. Solution:
After I adjusted the play out of the bottom bracket, the rubbing
noise went away.” If
the clicking is constant,
it’s probably because you’re riding in an extremely
angled gear, such as being on the small chainring and the smallest
cog, which puts the chain at an extreme angle as it goes from
the inside on the front to the outside on the back. At this
extreme angle the chain can brush against the side of the front
derailleur cage causing a constant clicking as the metal pins
and links bump against the metal derailleur cage.
Solution: Slightly move
the shift lever to move the derailleur to clear the chain. This
derailleur fine-tuning is called “trimming the front derailleur”
and is required when you’ve shifted into extreme gears,
sometimes called “crossover gears.” Ideally, you’ll
avoid these extreme gears because they can accelerate chain
and sprocket wear.
If
your titanium frame clicks when you’re pedaling hard or climbing,
check your bottom bracket. Solution: Usually, this
click is caused by either a loose or inadequately lubed bottom bracket.
Remove the crankarms and with the appropriate tools for your type of
bottom bracket, remove the bottom bracket, lube the surfaces in contact
with the frame and reinstall the BB making sure it’s tight. If
lube doesn't stop the click, try using Teflon
tape
instead (plumber’s tape). Simply wrap it around the cups and reinstall
them.
A loose replaceable derailleur hanger on the frame can cause clicking.
Solution:
A lot of new bicycles have pieces bolted on the rear dropout that make
it possible to replace the derailleur hanger if it gets bent (the part
that the rear derailleur is attached to). These are usually held on
with bolts. If the bolts loosen, the hanger can move and make a click
noise. To fix this, loosen the bolts, grease
the bolts, threads and hanger (where it contacts the frame) and tighten
everything securely.
Loose pedals and ones with dry threads can click. Solution: Make sure the
pedal threads (the part that threads into the crankarm) are lubricated
and that the pedals
are securely tightened. TIP: Use a long wrench
and remember that right pedals are turned to the right to tighten; lefts
are turned to the left (because they are left-hand threads).
Thanks to RoadBikeRider
reader, Alan
Medcalf for this tip.
Clicks can be caused by grit, dirt or debris in a pedal bearing.
Solution: To determine for sure
if a click is coming from a pedal, temporarily replace the pedal in
question with a different one. If that makes the click go away, you
know your noise is coming from the pedal. In most cases, you can apply
lube to a pedal simply by removing the dustcap on the end of the pedal
and squirting in some automobile-weight oil. Rest the bike on its side
to let the lube travel throughout the pedal. After that, the click should
be better and possibly go away. If not, you may need to overhaul the
pedal (disassembly, cleaning, relubing and reassembly) or replace it.
Handlebars and stems can click, too.
Solution:
To quiet handlebars, loosen the stem binder bolt, slide the bar’s
clamped portion sideways, sand it lightly with emery cloth, apply grease
to the bar and bolt(s), reassemble, tighten and wipe everything clean.
Brake levers can click.
Solution: Tighten the levers.
Pedal and wheel reflectors can cause clicks.
Solution: Tighten the reflectors,
if possible, or reposition them, or lubricated the fasteners or contact
points.
Quick releases may click. Solution:Tighten
the quick release (this will make it harder to close the lever).
You may also need to lubricate the parts of the quick release and then
tighten it, because if the small parts have become dry, that can cause
clicks, too.
Front derailleurs can click. “The clamp-on front derailleur
on my titanium Merlin Extralight was causing an irregular clicking sound
like a hot car engine cooling.” Solution: “Turns
out that the force of pedaling deforms one side of the seat tube (and/or
pulling on the shifter cable) just enough to cause friction between
the clamp and seat tube, and a little anti-seize took care of the problem.”
Thanks
to reader Ben Gustafson for this tip!
Here's another one.
"When out of the saddle there was an annoying click/crueak
from my aluminium/carbon frame. I did all the usual checks i.e.
all bolts cleaned, re-greased and tightened, fork dropouts and wheel
nuts greased to prevent the grate of any friction (which once happened
previously). Still no success. I then cleaned and relubed the chain
(even though it was fine really but I did it all the same). I even
changed to a spare set of wheels to discount problems with the 'hoops'.
Pedals removed, cleaned etc. Nope!
Solution: I
then checked the front mech (clip on). The bolt wasn't as tight as
I'd have thought necessary. I undid the front mech clamp, cleaned
the bolt and thread and re-greased and reattached the mech.Bingo!
The noise vanished. I suppose the twisting/pedal stress going through
the main tubes from the bottom bracket area must have been vibrating
into/through the mech?"
Thanks Johnny in Leeds, UK!
Hubs can make a clicking sound as well. “The bearing
preloads on some hubs are affected by how tight the quick release
is tightened. When they’re not tight enough they click (American
Classic front hubs are notorious for this).” Solution: You need to
tighten the QR until it becomes very difficult to open it later on;
but it does stop the noise. Also, it’s really hard to determine
if it’s the hub or the bottom bracket, so tighten one and if
it’s still a problem, tighten the other — use a torque
wrench with the BB however.
Thanks to RoadBikeRider
reader, Andy Meyer of Tucson, Arizona for this tip.
Cable housing sections can click as you turn the handlebars to
steer. Solution: Lubricate
the point where the housing ends enter the frame stops. Often, the
end of the cable housing has a metal or plastic cap (called a "ferrule").
This can move when you turn the bars and make clicking noises. The
end of the housing can also move inside the ferrule and make noise.
Usually, applying a few drops of medium-weight oil to the ferrule,
the housing and the frame stop will stop the clicking.
For Clicking that goes away when you stand.
Solution: This is probably seat related. Spray a little
lube where the rails connect to the seatpost. Also, tighten the seatpost
bolt that tightens the saddle. TIP: If it’s
loose, you may need to level your seat first because it may have moved.
And, be sure to check the seatpost binder bolt, too, the one
that passes through the frame to tighten the seatpost in the frame.
Solution: Remove the seatpost binder bolt, grease
the threads and outside surface where it contacts the frame, and reinstall
it.
Another source if you ride a dual-suspension or folding bike is
the pivot points.
Solution: Check that all pivot bolts are snug and
if the pivots do not contain bearings apply a few drops of lube (if
there are bearings they should be sealed and not require lube), work
the suspension or hinge (on folding bikes), and wipe off any excess
lube.
Water bottle screws and bosses (the part in the frame) can click.
This click is less likely on steel frames because the water-bottle
bosses are welded into, and part of the frame, however, on many aluminum
and composite frames, the bosses are glued and/or mechanically fastened,
which means they might move (a full small water bottle weighs about
1.5 pounds, so the bolts and bosses are working, not just sitting
there). Also, even if the bosses are tight, and even on steel frames,
loose or dry water-bottle-cage bolts may click. Solution: Try lubricating
the boss and bolts and tightening the bolts. Still click? Try removing
the bolts, applying Teflon tape to them and reinstalling. If the click
remains, you may need to repair the frame bosses. You can try to epoxy
loose bosses to hold them in place, but this is usually a temporary
solution at best. Most manufacturers offer the tools and parts to
repair and replace bosses, however, it’s a little tricky and
it’s best to let your bike shop do the work so you don’t
accidentally damage your frame.
Water bottles can
click.
This is something I experienced when I tried a taste-free plastic
bottle made of a harder material. I could stop the click by pressing
the bottle down against the cage. But, it would gradually move and
the click would return. Solution: I simply went
back to standard soft-plastic bottles. They’re easier to squeeze
too.
Clicks can also be caused by cracks in the frameset. Solution:
Listen carefully to try to determine what part of the frame the noise
is coming from and then inspect that area for cracks (it’s best
to clean the frame first so that debris can’t hide the defect).
Common failure points include tube intersections, especially at the
bottom bracket and fork crown, and also the dropouts. If you think
you see a crack but aren’t sure, try pushing sideways on the
frame with your foot, which will usually open the crack making it
more visible. If you find a crack or think you’ve found one,
stop riding the bike and visit your bike shop for an expert opinion.
Some framesets will be replaced under warranty, though the shop will
charge labor to switch the parts over in most cases.
Ticks You hear a tick with each pedal revolution.
Solution: Is the front derailleur cable protruding
and striking the crankarm with every pedal stroke? If so, bend the
cable so it can’t touch the crankarm.
Reader Julian Earl from the UK had this tick. He explains, "I
cannot resist adding a rather easy and/or embarrassing one. A soft
tick with every pedal revolution. Solution:
The problem was too long an end on the cable to the front derailleur
so that the crank hit the cable end every revolution. It only catches
you out once!"
Thanks Julian!
With each pedal revolution you hear a tick.
Solution: Is the front derailleur adjusted wrong and
slightly too far out so that it strikes the crankarm with each pedal
revolution? Take a close look at the back of the crankarm. If the
derailleur cage has been brushing against the arm, the cage will scrape
a little line in the back of the crankarm (if this gets deep enough
it can cause the crankarm to break). Fix the noise by fine-tuning
the front derailleur high-gear limit screw to limit the derailleur
cage so it can’t touch the crankarm.
With each pedal revolution you hear a loud tick.
Solution: If you have a kickstand, check to make sure
that the crankarm isn’t striking it on each revolution.
Solution: If necessary, loosen the kickstand, adjust
it so that it misses the crankarm and tighten it. DO NOT OVERTIGHTEN
or you may (depending on how your kickstand is mounted) crush the
frame tubes.
When you apply pressure to the handlebars you keep getting an annoying
tick.
Reader Cole Griesemer suggests, "This
has happened with every threadless headset I've ever encountered,
and is a consequence of the bearing adjusting mechanism (the parts
above the frame's head tube) not being sufficiently greased (often
not greased at all). Solution: Pull
apart the headset and apply grease liberally to all surfaces. Reassemble
and bask in the absence of noise.
Thanks
Cole!
On your new bike you hear a soft tick, tick, tick, tick and
the faster you go, the faster it gets. Solution: Look on the
side of the tires to see if there are tiny, long rubber fingers protruding.
These sometimes remain after the tire manufacturing process and if
they’re long enough, they may strike the chainguard or frame.
While this won’t cause any damage, it can drive you batty trying
to figure out where the noise is coming from. Simply cut them off
with a pair of scissors.
Squeals The most common source of squealing or squeaking is the brakes.
This is caused by the brake pads vibrating against the rims. Solution:
For quiet operation, pads must be in good condition and “toed-in,”
which means that the front of the pads contacts the rim before the
rear. If the pads are several years old, replace them. If they’re
striking the rim flat, carefully adjust
them so that the front touches before the rear. Most brake pads
feature a mechanism for making this adjustment. TIP:
If your brake pads are in good shape and toed in and still squeaking,
it may be because residue has built up on the rims. Clean them with
a solvent, such as lighter fluid and then lightly sand them with medium
emery cloth to scuff up the surface of the rims and break up any rubber
deposits on the rim.
Creaks The common culprit here is clipless pedals and cleats.
Solution: Make sure the cleats are tight and lubricate
the cleat mating surfaces with wax, spray lube, Armor All or some
other friction reducer. You may need to experiment to determine what
works best for your particular brand and model of clipless pedals.
TIP: Just be sure not to walk into your living room
with your freshly lubed cleats and track grease across your carpets!
Also note, that if your cleats are old, they may be worn out and that
will let them move when pedaling, which also causes noise. Compare
them to a new pair so that you can gauge wear and replace them if
they're worn out. Here's a lot more
on cleats.
Another source if you ride a dual-suspension or folding bike is
the pivot points.
Solution: Check that all pivot bolts are snug and
if the pivots do not contain bearings apply a few drops of lube (if
there are bearings they should be sealed and not require lube), work
the suspension or hinge (on folding bikes), and wipe off any excess
lube.
Water bottle screws and bosses (the part in the frame) can creak.
This creak is less likely on steel frames because the water-bottle
bosses are welded into, and part of the frame, however on many aluminum
and composite frames, the bosses are glued and/or mechanically fastened,
which means they might move (a full small water bottle weighs 1 pound
7 ounces, so the bolts and bosses are working, not just sitting there).
Also, even if the bosses are tight, and even on steel frames, loose
or dry water-bottle-cage bolts may creak. Solution: Try lubricating
the boss and bolts and tightening the bolts. Still creak? Try removing
the bolts, applying Teflon tape to them and reinstalling. If the noise
remains, you may need to repair the frame bosses. You can try to epoxy
loose bosses to hold them in place, but this is usually a temporary
solution at best. Most manufacturers offer the tools and parts to
repair and replace bosses, however, it’s a little tricky and
it’s best to let your bike shop do the work so you don’t
accidentally damage your frame.
“I had a mystery creak on my carbon bike that would appear
on each hard pedal revolution.” Solution: It turned
out that it was caused by the front fork dropouts, which were covered
in a kind of “plastic chrome” that was flaking off, making
an uneven surface. Sanding it off solved the problem.
Thanks to RoadBikeRider
reader, Joseph M. VanLeuven of Glasgow, Scotland
for this tip.
“My
bicycle is an 2007 Raleigh Competition, which is equipped with an
Easton EA70 carbon fork. The bike came with a stack of 5 5mm headset
spacers beneath the stem. I replaced them with a single 25mm spacer
from Chris King. My
creaking noise came when I would get out of the saddle on steep climbs.
I went through many potential causes and fixes with no change. Then
one evening the old light bulb went off. Surely, I thought, there
must be some amount of deflection in the fork steerer tube when I
stand and climb a steep grade. Could this deflection be causing the
noise? Solution:
I removed the stem and spacers and lightly lubed the steerer, and
each contact surface as I reassembled. I also snugged the assembly
down a bit more than I had in the past, being careful not to preload
the bearings too much. And YES, the noise has gone away!”
Thanks to reader Dave Elkow from
Corbin, Kentucky for this super tip.
"Nokon cables can develop an elusive creak. The creak
occurred on each pedal stroke but only when I was out of the saddle,
and seemed to come from the bottom bracket area, and developed very
gradually over time. When it finally got to the point where I couldn't
ignore it any longer, I checked all the usual suspects, and finally
stumbled upon the cause—my fancy Nokon cables. Presumably some
combination of dirt, moisture, and oxidation between the outer segments
was the cause. Solution:
The cure was a few drops of WD40 wiped over the casings, wiggle them
about a bit, and: silent bike!
A tip of the helmet to Peter Heppleston
up in Edmonton, Alberta for this helpful tip.
"I
have another creak noise solution that hopefully will help anyone
who has been pulling their hair out for over a month like me! Around
6 weeks ago I started developing a really loud creak on my Scott
S30. It sounded like it was coming from the bottom bracket area
but I just couldn't tell. The noise was pretty much constant and happening
in the seat, out of the seat, pedalling and freewheeling. There was
just no way of telling where it was coming from.
I
commute 2 hours a day and it was getting pretty embarrassing riding
into London and back with this really loud constant noise. Twice I
stripped the bike down and following your site, cleaned, re-greased
and put back together all the main culprits. However the problem persisted.
As
the bike is 2 years old and had done 4,000+ miles I thought it could
do with an overhaul anyway, I ended up replacing the bottom bracket,
chainset, pedals, seatpost and even bought new shoes. To my amazement
the problem was still there! Thinking now it could be a crack in the
alloy frame I took it to a frame specialist who again, stripped the
bike down and checked it over, a couple of small dents were found
but no cracks. So, it was re-built again, road tested and the creak
was still there.
It
was on this last test that I found the creak no longer happened while
standing up. So, it was definitely seatpost/saddle related and, knowing
the seatpost was new, had been greased to within an inch of its life
and the down tube had also been checked - I started to focus on the
Specialized Toupe Comp Gel Road saddle.
Solution:
I had previously tried greasing the saddle rails as I had read on
your site which also didn't work. I then thought, well the rails obviously
attach into the saddle, I may as well try lube at that end as well.
The sound stopped straight away! I was speechless that a problem at
the top of the saddle could sound that bad at the bottom of the down
tube. Now, with all the new and greased parts the bike is running
like new. I'm just a few hundred pounds lighter!"
This great tip is courtesy of Stuart Jones
in the UK. Thanks Stu!
Your noises and solutions
[Editor's note:It's always great to hear from
the guys in the trenches in the bike industry. This first letter comes
from one of the great
innovators in cycling today and one of the fathers of carbon framebuilding,
Craig Calfee of Calfee
Design and Bamboosero.
His office is only a short ride from mine and I've known him since
he was making frames for Greg
LeMond. Craig's a nice guy.] He writes, “Just saw your
bicycle noises page. I'll be sending people to that because I get
a lot of people thinking it's their carbon frame. And sometimes I'll
get a frame shipped to me asking me to fix the strange creak coming
from the bike. They can't find the source, so it must be the frame,
right?"
Craig's Shimano chain & Campagnolo cassette creak fixes
"I
was working neutral support at Ironman Hawaii and we were checking
over a brand new bike for a Pro rider a few hours before the cutoff
time for checking in your bike to the transition area. He said it
worked fine but had a strange creak when applying real pressure
to the chain, as in climbing. After checking everything and replacing
most of the components, we were still stumped. The last thing to replace
was a brand new, well lubed Shimano chain. But the chain seemed fine.
Solution:
With
that being our last option, we replaced it anyway. The creak went
away! I've since seen that on only one other bike with a new Shimano
chain.
Another one is what I call "Campy cassette creak."
A dealer and his customer came to see me with the bike, absolutely
certain it was the frame making the noise. They had even switched
rear wheels to another Campy wheel and still the noise was there.
I couldn't find anything wrong with the frame so I switched the wheel
with a Shimano wheel and the noise went away. Solution:
Certain
early 10-speed Campagnolo cassettes with the loose cogs will creak
if the cassette body is not completely slathered with heavy waterproof
grease before installing the cassette. This is actually pretty common.
The Campy cassette cog has only 4 points of contact with the cassette
body. The Shimano has 9. But when pinned together like they do now,
it seems to solve the problem."
Nice tips, Craig. Thanks!
Jody's Mavic wheels creak fix
"Hey Jim, I don't know if this one is well known, but I have
never seen it listed so here it is. On Mavic front hubs (those found
on pre-built wheelsets), there are small, aluminum axle caps (NOT
the adjuster ring that takes a pin snanner to adjust) that meet the
fork dropouts on each side of the hub when the wheel is mounted. These
caps can be pulled off the axle by hand and usually have an internal,
rubber O-ring that mates with a groove on the axle to secure them.
These caps bear down on the hub bearings. A creaking noise occurs
at the interface of these caps with the bearings when you are torquing
on the handlebars while climbing or sprinting, etc. It is caused
by the small amount of movement (dry contact) between the two surfaces.
It is EASILY mistaken for creaking handlebars, bottom brackets, noisy
cracked frames etc. Solution:
To diagnose it, if you hear a creaking sound, try a different front
wheel (one that has the standard locknut and cone on a threaded axle
arrangement) to see if that makes the sound dissappear. To fix it,
pull off the front wheel, take out the front quick release, pull off
both axle caps and grease (liberally) the inside surfaces as well
as the inside mating surface where the axle cap meets the hub bearing
(not the dropout-side surface). Reassemble and re-install the wheel
and test ride. I have firsthand knowlege of this noise coming out
of front hubs found on Mavic Ksyriums, Cosmos and Helium wheels and
I can see it happening on any other Mavic hubs that use this type
of design."
These helpful and expert tips are courtesy of Jody
DuMond. Thank you Jody!
"I
developed a strange noise, neither a tick nor a click, more like
a course rubbing. It was worse over rough surfaces, and much worse
when I stood to climb and the bike rocked side-to-side. It became
a joke with my riding buddies. They made a fuss about staying clear
saying my bike might fall to pieces at any moment. Solution:
I tried everything even rebuilding the wheels, yet the noise persisted.
Finally I looked at my speedo magnet. It is a small
metal case with a round magnet inside. The case had obviously been
hit by a stone as the magnet was loose. I removed it, crimped the
metal casing down onto the magnet with pliers and refitted it to the
wheel. Silence!”
Thanks to RoadBikeRider
reader, Phil Sheard of New Zealand for this tip.
"Recently, there was an annoying clicking
noise in my Eddy Merckx’s rear wheel that would subside midway through
rides. Thought it was probably the bearings. Mike Johnson at Wheelfine
Imports said the bearings were fine, that the noise was coming
from inside of the rim: sometimes metal shavings, rust from
the spoke holes get in there & rattle around. Solution:
Per his instruction, I took off the rim tape & shook down
said small bits of debris, exiting them through the valve stem hole.
My Merckx is runnin’ silent, once again!
Thanks to Mark Boriek of Lebanon, New Jersey for
this great tip!
Using an auto
mechanic's stethoscope
to track down noises
“Noise 1. A few years ago I had a custom made
Bruce Gordon
steel frame bike that started making a click whenever I pushed pretty
hard while riding in the sitting position. The noise or click happened
on nearly every down stroke of the right pedal, near the bottom
of the stroke. This about made me go mad. I had looked at everything,
chainring bolts, crank bolts, bottom bracket, seat to seat post connection,
stem to bars, stem to steer tube connection, all to no avail. One
ride I stopped with a friend and I was determined that I would either
solve the noise, or at least be able to find a way to recreate it,
so I could study it further in my shop. While standing beside the
road, we discovered that if you "loaded" it by pushing down
on the left crankarm real hard (with the crankarm horizontal and forward)
with your hand, then backpedaled 180 degrees, the noise would usually
appear. This was
good enough for me. Later, back in my shop, I retested the loading
procedure and it still worked. I got down my handy dandy auto stethoscope
that is used to find noisy bearings in your car, and inserted them
in my ears. Solution:
After several attempts, I homed down the noise to the middle of the
seatpost. Not the top or bottom, the middle. I tightened the seat
binder bolt, and it did nothing. It was already tight, anyway. I then
loosened and removed the seatpost, and noted that
it had grease on it, but not overly wet with grease. I then made sure
it was clean, regreased and installed it back in the seat tube and
Voila, problem absolutely solved. I have had to do this every couple
of years, every time the noise reappears. Evidently the light-gauge
tubing will torque just enough that it twists against the more rigid
seatpost, and when the grease wears thin, it will make a faint click.
Who’d
a thought?
Noise
2. I have a Orbea
Orca that is about two years old now. I run wheels that have DT 240
hubs, 10-speed Shimano Dura-Ace. I was getting a noise that I swore
was coming from the bottom bracket area. Solution:
To make a long story short, using my stethoscope again, I found that
it was coming from somewhere near the rear dropouts.
I checked the bolt on the rear derailleur hanger thingy and it was
tight. I put a thin coat of Phil
Wood grease on all four faces of the rear dropouts and the noise
was gone. I did it last year and had to do it again one time this
year.
Noise
3.Drivetrain noise after installing a new chain.
I have an Orbea Orca with wheels that have DT 240 hubs, 10-speed Shimano
Dura-Ace transmission. First I just changed the chain with a new Shimano
Dura-Ace 10-speed chain just like the one I had. The noise appeared.
I had a new (expensive) cassette, just like my old worn one, but was
hoping I could squeak another year out of the old one. But since I
hated the noise, I went ahead and put the new cassette on. Keep in
mind, the old one did not skip, like they will usually do if they
are worn bad. Well the noise was still there. It was a kinda normal
noise, only it was quite a bit too loud. Kinda like running a clean
dry chain. Solution:
When I touched my stethoscope to the bottom derailleur pulley
on the rear derailleur, it screamed in my ear. It wasn’t
the bearings making the noise, it was the chain slapping the pulley,
only in a manner that made a lot of noise. Nothing was out of line
at all. Scratching my head, I removed the guilty pulley and examined
it, and it looked unworn and almost pristine. I decided to install
it backwards, and let it rotate the other direction, figuring it might
at least change the noise. It made the drivetrain almost silent again!”
Thanks
to Steve Bales for these 3 tips!
“I could not find the solution to a loud and irritating clicking
that was happening whenever I turned the pedals on my bike. (Probably
because the cause of the clicking would have been obvious to most
riders!) The clicking itself was loud, distinct and would increase
in speed and intensity the harder I pedaled. Solution:
Having gone over the rear derailleur and taken apart
the rear wheel hub I realized that after recently removing the chain
to clean it, I had put it back so that it ran over (and not under,
if that makes any sense) a small metal guard situated between the
pulleys of the rear derailleur. Of course I laughed at my stupidity
(I had cut short a training ride because the noise was irritating
me so much) and I’m
not sure that such a basic error deserves a mention on your list—I
thought however that I would share it with you in case anyone else
manages to do the same thing.”
Thanks to Edward Hollingsworth!
Beware a creaking/clicking handlebar for it might be a sign
it's about to break
“I had a creak used to come from my alloy handlebar/stem
area when pulling on the handlebars. Tightening
the stem on the handlebars made no difference to the creak. Some time
later the left handlebar snapped off whilst I was commuting home at
night in Edinburgh traffic. I was lucky—only bruises, grazes
and a cracked rib. Solution:
I
should have checked the handlebars for any signs of cracking
at the stem interface and replaced the handlebars if I found
any cracks or other signs of metal fatigue.”
Thanks
to Julian Kettle for this excellent piece of safety
advice related to bike noises!
Even
accessories like bottle cages can cause noises
“I own a Litespeed
Siena (titanium) with Dura-Ace 20 groupset. My bike started making
a clicking/creaking sound that I thought was coming from the bottom
bracket area. It only manifested when pushing hard into the pedals
especially when standing. I read all the tips on your site and followed
them all to the letter, but to no avail; the noise still persisted.
I then changed the bottom bracket, chain, rear block, pedals and rebuilt
the hub on my rear wheel with new axle and cartridge bearings, but
still with no success!! I tried swapping all the components one by
one, wheels, pedals, chainset etc... but still the noise remained.
At this point I was at a loss and contacted several bike shops and
spoke to their mechanics, and explained my problem to them and what
I'd done to try and rectify it. They all came to the same conclusion
as myself at this point, as I'd tried every possibility systematically
and the problem still remained, the only possibility that remained
was a cracked frameset, (rare on high-end titanium, and very expensive
to replace). At this point I was glum to say the least! So I sat and
had a long think about the noise, when it started, had I replaced
or added any parts to the bike, etc... ” Solution:
“It
was then I remembered/realised I'd fitted a new composite (carbon)
bottle cage, surely that couldn't be the cause of
the noise?!! After all I'd taken out the bolts copperslip greased
them and reinstalled them tightly as recommended on your website.
So I reinstalled the old aluminium cage and hey, presto, no more noise!!
I even put the composite cage back on to be sure and the noise returned.
The composite cage must have been making contact with the frame when
the frame was flexing under load when pushing hard into the pedals,
a very expensive and frustrating lesson for me to say the least. Maybe
my story will help others realise that noises coming from their bike
may just be down to a composite bottle cage, especially if their frame
is titanium.”
Thanks to Gavin Wood, Hartlepool,
the UK!
"I want to pass along a noise that has taken me a
long to diagnose, a loud click that sounded like it was coming
from the bottom bracket. I had a local bike shop try to find the
click, but they basically lubricated the bottom bracket outer rings
(it's sealed, so the bearing surfaces were OK) and the headset (also
sealed). I then purchased a new bottom bracket which didn't help.
I also purchased new headset bearings which also didn't help. I pulled
the seatpost, all cables, brakes, etc... off and reinstalled all to
no avail. I then began to troubleshoot with your website, and since
I have a Merlin Magia I read with interest the section on the clamp-on
front derailleur and the loud click when the bike would twist. I put
teflon tape under the clamp, but that didn't really help either. So,
I was at my wits end when I began to removing parts: bike wheels,
pedals, and water-bottle cages. None of that helped either! I was
beginning to think I had a damaged frame. Then, I began to wonder
about my bottle bosses on the frame. The bosses on my Magia are aluminum
rivnuts not braze/weld-ons. Merlin's website recommends that the bolts
not be too tight or else the rivnut could be damaged. Solution:
My rivnuts were indeed too tight, so I tried to lubricate them,
but they were so tight that didn't work either. I then began to look
at how the rivnut actually seats on the inside of the tube. Rivnuts
are like toggle bolts for the wall, so I needed to figure out how
to loosen it. I put one of my bottle cage bolts into the rivnuts and
lightly tapped the bolt with a plastic/rubber mallet. The bolt/mallet
then stretched the rivnut back into the tube. CAUTION must be used
not to dent the tube around the rivnut. I was then able to rotate
the rivnut with a pair of pliers to allow a small amount of lubrication
between the tube and the rivnut. This seems to have done the trick:
Loosen and lubricate the rivnut."
That's a cool tip, Ronnie Boutte
from Utah. Thank you!
"I have had a few troubles with noises on my bike, a few were
mechanical and took a bit of sorting out and a few embarrassingly
simple in their solution. I recently changed my BB, certain that
the noise I heard and felt came from it. Solution:
It turned out to be a rear wheel ball bearing had begun to break down
and needed replacing. I have also had a seemingly random noise which
drove me nuts which turned out to be a zipper tag on my saddle
bag ticking against the rear mud guard. Then there was the
set of keys in my saddle bag for my bike lock and back door to the
house, jingling when stood up on the seat. Last but not least
was the noise which I finally tracked down to one certain drink
bottle which was made of a plastic which creaked inside the drink
bottle cage. I hope these help the visitors to this page—or
at least give them a laugh."
Good ones, Jimmy G. Appreciate it!
Reader
Joshua Naylor came up with a quick and simple way to silence his U-lock.
When he carried it on his bicycle in the carrier that came with
the U-lock, the lock would make a rattle over every bump. Solution:
It was the loose fit between the U part of the lock and the crossbar
that made the racket. So Joshua came up with the elegant solution
of wrapping elastic bands around the ends of the U and he now enjoys
solitude on his rides again.
Thanks Joshua!
Those pesky wheels again
“I recently installed a new pair of Zipp
404 tubular wheels on my Guru
Geneo carbon bicycle. The first time I took the bike out with the
new wheels was on a century ride. Immediately, I knew something was
strange. A loud clicking noise was clearly evident with each rotation
of the wheels, but only under load. Spinning the wheels while
I was not on the bike would not reproduce the noise. Every
time I passed someone on the ride or someone would pass me, I would
get, 'Dude, your crank is hitting your cadence sensor.' I stopped
and examined the crank sensor proximity and all was well.” Solution: “Once
I got home, I had the time to check things out. It turns out that
the valve stem on the tubular tires was loose and
moving under pressure and striking the rim making the noise. To fix
it, I cut a 1-inch length of black electrician's tape, folded it in
half (backwards so the adhesive would not stick) and cut a small slit
centered in the tape width. I then slid the tape over the valve stem
and secured it to the wheels and the stem to keep the stem from moving.
Silence is golden.”
Thanks to reader Michael Kravit for this tip!
Clothing and shoes cause annoying bike noises too
"I once spent weeks trying to track down an intermittent rattling
noise, which appeared to be emanating from the handlebar area
of my Kingcycle recumbent when traversing bumpy roads. Solution:
It turned out to be my watch strap!" [Editor's
note:zipper pulls can do this too!]
Thanks
for this funny tip Dave Larrington from London!
“I’ve recently had a situation
that was driving me and my riding companions a little crazy. My bike
developed a loud click on each pedal revolution. I was told
this might be related to my cranks and/or pedals. Both were inspected
by me and found not to be a problem. Various adjustments were made
to the rear derailleur too, to no avail. The local bike shop only
managed to suggest that I was cross-gearing... which I was certain
I was not, having been warned not to do that previously. So, I thought
I may simply have to put up with this.” Solution: “I then
noticed that when I took off my Nike shoes that they
rattled (and they hadn’t always done this). The shoes are equipped
with several attachment points for cleats, one set of which wasn’t
being used by my Look cleats – and the bracket/plate for the
unused attachments was moving backwards and forwards through the pedalling
motion. So, some modelling clay stuffed into the bottom of the shoe
to hold the spare plate fixed the problem... there was no other way
to tighten or remove the unused plate. Hope this is of some interest!”
Thanks to reader Peter
from Perth, Western Australia for this tip!
The
click that was bothering me was sporadic but would happen almost every
pedal revolution, maybe for 5 minutes then go away. It would continue
to come and go through my ride. If I un-clipped my right foot and
pedaled with just my left sometimes it would go away sometimes it
wouldn't and same with the left. Backpedaling was the same result.
The outside temperature did seem to make things better or worse sometimes
(colder worse). Also the longer I rode the less the noise level. Solved
it yet? Solution: The
issue was that shoes had metal plates for SPD cleats. They were underneath
my normal 3 bolt cleats so I didn't see them and they didn't make
noise until a few weeks after getting the shoes. I had checked the
cleat bolts and they were tight too. I noticed when I had taken my
shoes off and walking in the garage, and with them in my hands that
I heard the noise. Upon shaking the shoes vigorously I could make
the plate move around and recreate the noise. A little clear slicone
caulk solved the issue.
Appreciate you sharing Wallace Wormley!
“My issue was a ticking
noise once per crank revolution.” Solution: “I’ve
now learned to tuck in the laces on my new SPD shoes
(embarrassed).”
Thanks to reader John Mallard from Bournville, UK
for this tip!
Tips
for when your bike is just too loud
“Maybe these are too obvious, but they weren't to me, so here
goes: I have used three or four different brands of rear hub for my
mountain bikes over the years, and I noticed that some of the rear
hubs clicked louder than the others when coasting. I thought the
loudness of the clicking was determined by the design of the hub.
However, after I stupidly used high pressure water to clean my bike
and ruined the bearings inside the hub and freewheel, I had to take
the hub and freewheel apart, clean them, and replace
the four cartridge bearings. Solution:
I didn't know how much grease to use in the freewheel,
so I packed it full of grease. I was pleasantly surprised to find
that the coasting clicks got much, much quieter. In fact, I can now
coast almost silently, and the three teeth still engage normally when
I pedal. That's good for me because I like trekking over long distances,
and listening to the sounds of the birds and the wind. Plus, after
breaking in the rebuilt hub for 30 km or so, it was still quiet, and
didn't seem to have any more friction than it did new. [Editor's
note:be careful taking apart and greasing freewheels
and cassettes. Most aren't made to be taken apart or lubricated with
grease, which can sometimes cause the drive mechanism to slip, especially
in cold temperatures. A better lube to use is a heavy oil like Phil's
Tenacious Oil. Drip it into the freewheel/cassette through the
small gaps in the body.]
Another
huge noise reduction technique that surprisingly few people in Taipei
seem to recognize is the use of smooth tires instead of knobby
tires. Most people here spend 100% of their time on roads,
so there's absolutely no reason for them to have knobby tires. All
they accomplish is increased rolling friction and a loud hum at
speed. When you're climbing a mountain road, listening to the
birds singing and the wind blow through the treetops, it's annoying
even riding near a person with knobby tires. Solution:
Use smooth-tread street tires.
Finally, I use a Brooks
leather saddle. It's great, and I'd highly recommend one
to anyone who does any serious trekking, and spends a lot of time
in the saddle. I recently had a squeak coming from my saddle.
I thought it might be the leather rubbing against the metal, but it
turned out to be metal on metal where the two rails under the seat
were clamped to the seatpost. The black coating on the two rails had
worn away in a couple of places, causing the diameter of the rails
to differ along their length. No amount of tightening the clamps could
stop the squeak. Solution:
A little oil on the rails did the trick.
There you go. A click, a hum, and a squeak.”
Thank you Zach from
Taipei!
Assembling something the wrong way can cause noises
“My bike was running pretty quietly except for the occasional
“clunk,” which would happen when I was out of the saddle, mashing
the pedals, and pitching the bike back and forth. I never seemed
to notice it unless I was doing those three things. I wasn’t positive
where the noise was coming from, of course, so I checked the most-likely
offenders first, pedals, chainring bolts, seatpost, headset, front
and rear dropouts, quick releases, bottle cages, etc. Loosened, cleaned,
lubed and re-tightened all of them. When the problem persisted I thought
that it must be coming from my bottom bracket. I pulled my SRAM
Force crankset (BB30), cleaned the spindle, all the threading,
cleaned between all the spacers, BB cups, and inside the BB shell.
Greased and re-installed everything, checked to make sure the crankarm
was properly torqued by pulling it against the down tube. That’s
when I noticed my problem. Solution:
There was play in my crank! I took everything apart again,
and noticed that I had a curious lack of spacers (relative to what’s
diagrammed in the SRAM Force manual). I pulled spacers from a crankset
I had lying around, installed them on the spindle before putting the
crankarm back on, and presto, the play was gone, there was no noticeable
flex in the arm, and I haven’t noticed the clunking anymore. Must
have misplaced a couple spacers while cleaning the bike. Hopefully
this will stop a few people from going crazy!”
Thanks to reader Jake
from Washingon, DC for this tip!
"I thought I'd chime in on a click my bike was
making. I've used your noise-finding tips here with great success,
but this click just wouldn't go away. With uphill pedaling force,
the drive side crank would click a couple of times between 2 and 5
o'clock. After regreasing all bottle cage bolts, seatpost, seatpost
bolt, places where the cables touch the frame, adding lube to the
chainring bolts, replacing the pedals and bottom bracket (pedals were
bad anyway, and the BB had some slight side-to-side wobble), messing
with the derailleur clamp, and probably some other things... I finally
found a solution: I
simply sprayed some silicon lube around the spot where the right crankarm
touches the large chainring!" [Editor's note:Ideally the chainring will not touch the crankarm, so it's possible
the chainring is not seated on the spider or perhaps it's bent.]
Thanks
for the great tip Eric Wells!
"I had an experience recently which drove me
nuts and I'd like to think this could help somebody who had a similar
problem—just one more thing to look for. It was a brand new
bike and on the third ride of any length it suddenly started making
a ticking noise near the rear wheel. It still rode okay but it
was really irritating. Eventually I discovered (and I have no idea
how it happened) that the chain had managed to get outside the rear
derailleur cage! The gap appeared to be too small for the chain to
pass through, but somehow it had. Every time a link went over the
guard it made a click. Solution:
I had to carefully prise it slightly open with pliers
to slip the chain back in. (I don't know if there's a better way;
I'm no bike engineer!)
[Editor's note:Yes, to avoid bending the cage
and affecting the shifting, it's best to loosen the bolts passing
through the pulleys. That will let you spread the cage sideplates
and push the chain back where it belongs.]
Thanks a lot, Mark in the UK!
"Your site was very helpful in helping me diagnose
an annoying click/clunk in the drivetrain of our Calfee tandem.
It is equipped with DaVinci aluminum cranks. The click/clunk was intermittent,
sometimes in the middle of the ride, sometimes just at the end. It
seemed to be coming from the drivetrain. I tried all of the recommended
solutions - tighten the bottom brackets; remove the pedals, lubricate
the pedal threads, and reinstall; check and tighten the chainring
bolts; make sure the crankarms were tightened properly; check the
seatposts and stems; lubricate the seat rails; etc., etc. Solution:
What I finally found was that the chainring bolts
for the granny ring were not tight enough - I had to pull the drive
crank off to find this out, since the bolts screwed in from the back.
We rarely use the granny ring, so I didn't think to check this when
I checked the tightness of the chainring bolts. The granny chainring
bolts needed over a full turn to tighten them to the proper torque.
No noise since. Nothing is as satisfying as a quiet bike!!"
Props to Reed Nester of Williamsburgk,
Virginia for this drivetrain silencer!
Seatposts
are notorious noisemakers
"When I was out of the saddle, I got this squeaking noise,
driving me crazy. I did a total overhaul on my bike, but nothing
did any difference. Since it just appeared when I was out of the saddle,
I did not think it would have anything to do with the seatpost. When
I had turned every nut and bolt on that bike, the seatpost was the
only thing I had left to put grease on. Solution:
And yes, the seatpost was the source of the
sqeak and greasing it made the noise go away."
Thanks to Bjørn Berg of Norway for
this nice tip!
"I have a Giant Anthem X and with
my Thomson seatpost had a click. I tracked it down to the seatpost
after I changed my BB to a new one and that didn't quiet my bike.
I found the following solution
to completely eliminate the dreadful noise: 1. I
pulled the post and cleaned both it and the seat tube (for the seat
tube I used the round brush from Park
Tool's Brush Set that looks like the baby-bottle brush). 2.
I cut a short piece of old inner tube and covered the part where the
seat tube has the slot to compress. 3. I rotated
the seat clamp so the open side is forward (opposite slot!). 4.
I added an O-ring on the seatpost that sits tight on the post and
is slid down on top of the clamp to eliminate the dust migrating down
and into the seat tube and making the clicking sound."
Thanks to reader David Fontyn
from Israel for this extensive click-stopping tip!
"Thanks
for your site, Jim. I found it when searching for a solution to my
creaking carbon seatpost and although I didn't find a solution,
in the days following I found what seems to be a fix so here it is:
My bike is a 2007 Look 585 Team and I have a 3T
Dorico Team/LTD seatpost. After a particularly wet century
ride my seatpost developed a creaking noise when I was riding in the
saddle. My solution:
After eliminating other sources of the creak, i.e. bottom bracket,
pedals, cracked frame, etc., I narrowed down the source to the seat/seatpost
area. I swapped seatposts but the noise persisted, I swapped saddles
but still the noise persisted, I lubricated the seatpost binder bolt
but with no luck. I reinstalled the seatpost with carbon assembly
paste. Again no luck!
I
discovered when I listened closely that the noise was coming from
the point where the seatpost ended in the seat tube inside the frame.
My initial thought was that as my weight went back on the seatpost
it was causing the post to pivot very slightly at the binder bolt
point where the frame is reinforced through the carbon lug, causing
a slight deformation and rub in the thinner walls of the seat tube.
My first try to fix the noise was to go from a 350mm to a 250mm seatpost.
This only reduced the noise but at least I knew I was on the right
track.
I
then started thinking about the circumstances that had caused the
noise. I figured the wet ride had maybe washed something out of the
area that had been providing lubrication. Having read the warnings
on using grease with carbon I had to rule that option out so I thought
about what could have been there. I figured over time that due to
use, a small amount of fine carbon dust had formed in the seat tube
that had been providing 'lubrication.' I needed a substance to mimic
this. So I went to the hardware store and purchased a bottle of graphite
powder, squirted it into the seat tube and immediately the noise was
gone! Hope this is of use to you and the visitors to your site."
That's
a great job of finding and fixing an elusive creak. Thanks for sharing
it Craig Blowfield of St. Kilda, Australia!
Keep
your quick releases tight and lubed to stop creaks
"Jim, I was directed to your site as I had a creak on my bike
and I couldn't locate it. It sounded as if it was coming from the
bottom bracket/crankset area, happening while putting pressure on
the pedals (during the upstroke and downstroke, using clipless pedals),
no matter if I was standing, sitting or even without the saddle and
seat tube. The only moments I didn't hear it was while coasting
or while pedaling lightly just to keep the momentum. But when I was
sprinting or going uphill, it sounded as if I was riding an old matress
instead of a mountain bike. I changed the bottom bracket and the crankset
for new ones and the noise was still there. My rear wheel was rebuilt,
and the noise came back with the new wheel. I double checked my frame
for cracks and found none. I took it to a different LBS, and they
found the solution
for it. As it happened whenever I was putting torque on the drivetrain,
it could be coming from any part of it, including the surface of the
frame that makes contact with the rear wheel quick release! They just
opened the quick release and applied a drop of chain oil between the
QR and the frame, and voilá! I do that again every time that the creak
returns. (IMPORTANT: Just put extra pressure on the QR, as now it's
easier for it to slip from the frame!) Congrats on your site, as far
as an online bike noises troubleshooting guide goes, it's the best
I've found."
Thanks for sharing this excellent tip
Gustavo Gutiérrez Vargas!
What's the rattling around inside my frame?
"I installing a bottle cage to the vertical part of the frame
tubing immediately above the bottom bracket and on the next ride heard
a soft rattling sound inside my titanium frame. It turned out
that there must have been some metal filings in the bottle holes because
I could hear them when I picked up and shook the bike. When I took
it apart I found more debris inside. Solution:
I cleaned the BB all out, reassembled, and I have a quiet bike again!"
Thanks, Eric for this tip!
More
helpful ones
"When I bought my Mavic Ksyrium Elite wheelset last March, 3
months ago, I noticed that I would get a little pinging from the
spokes on the front wheel whenever I got out of the saddle, had weight
on the bars, and rocked the bike back and forth a little. I never
imagined that the pinging would develop into a full fledged creak
that would drive me crazy whenever I tried to jump, sprint, or climb
a steep hill out of the saddle but it did. It wound up sounding like
the creak one would hear from a loose bottom bracket except that if
I didn't rock the bike I could minimize the irritating sound. Solution:
One drop of Tri-Flow
where each spoke enters its nipple and at each point where the spoke
enters the hub. Ride it around a little to work the lube in and it's
good! I
also had a creaky headset. I don't care how good the seals are
on the lower bearings, they get nasty, dirty, and gross. Solution:
Diassembly, cleaning and greasing will end the creak."
Thanks Kerry of T2C Racing in Sandy,
Utah!
Bruce Gray writes, "Appreciate this article
Jim and I wanted to share three recent bike noise experiences: Noise #1. An inconsistent chirping noise developed,
sounding like it was coming from the rear derailleur jockey wheels.
I pulled them apart, as I had only overhauled them two weeks prior,
and wondered if I had lubed them wrong, or put them back in the wrong
way, or something. Anyway, re-lubing didn't make a difference. I then
swapped wheels thinking it might be coming from the freehub or hub....
nope. I then went through spaying one component after another with
WD-40. Solution: It
wasn't until I gave the chain a thorough blast of WD-40
that the chirpy squeak stopped. In my 12 month overhaul performed
two weeks earlier, I'd taken the chain off via a KMC missing link,
and soaked the chain in diesel. I presume the re-application of oil
afterwards wasn't intense enough. Noise #2. A creaking developed when pedaling hard
up hills in the saddle, and went away when out of the saddle.
Solution: Problem resolved
when grease applied to carbon seatpost. Noise #3. A creak with every pedal rotation coming
from shoes/pedals traced to cleat pedal interface. Solution:
It went away when both surfaces sprayed with WD-40. not a good long
term fix though." [Editor's note: try a wax
or oil. Just don't walk across your new carpets when you get home!]
Thanks for the tips Bruce
Gray from Brisbane, Qld, Australia!
A
reader named Mike says, "I had a rattle that
was driving me crazy for months. I tried lots of fixes and even
took it to a bike shop and nothing made a big difference. I incorrectly
assumed that there was just one source for the rattle. Your article
laid out a very systematic way to isolate the rattle (and also made
an important distinction between rattles, creaks, clicks, etc and
their causes).
I found a patch of rough pavement near my house. I went through your
list of rattle sources one by one and only changed one thing at a
time and then rode the rough pavement to see if there was a difference.
It took me two hours to patiently follow this systematic approach.
It involved taking things off and putting them back on several times
in some cases, but it worked a lot better than the haphazard approach.
Solution: It turned
out that several solutions fixed the problem, including tightening
a loose cassette, greasing and tightening the water bottle bracket
bolts (just tightening them was not enough) and greasing the dropouts
for the wheels (not 100% sure about that this was really a rattle
cause). I also found that the pump bracket that mounted between the
water bottle cage and the frame caused a rattle that I could not fix
no matter how I adjusted or greased. Therefore, I just took it out
and will carry the pump some other way.
The
rest of your article addresses the creaks and clicks that always show
up. Now I have a systematic way to fix those also." Thank you
again! Mike Salameh.
You're
welcome Mike and I appreciate you sharing your tips!
Chris Watkins
from Adelaide, South Australia wrote, "My noise happened on every
right pedal stroke: a creak noise driving my riding buddies nuts.
They could hear me 200 meters away! Only happened when sitting, not
standing!!! Bloody annoying and got worse as the bike "warmed up!!"
Sounded like it came from the bottom bracket, seatpost area so got
that overhauled. $130 later, still happening. Seatpost, cleats, pedals,
no good.
Solution: Finally tried removing
the bolt in the seatstay/dropout intersection (photo)
near the rear wheel axle (I ride a Fuji Team carbon road bike). I
took it out, greased the bolt and mating surfaces, reassembled and
tightened, and voila, no noise. I'll now do it again but use locktite
to ensure the bolt stays tight and my bike stays creak-free!"
Thanks, Chris!!
Cycling
professor Bill Boggs wrote with these helpful noise-busters:
"My
local bicyle shop and others I've used wrap the white teflon plumber's
tape you can get at hardware stores around the bottom bracket threads
to keep the BB quiet. And I can tell you from experience riding
them on my singlespeeds that only 2 brands of singlespeed freewheels
are quiet or silent: Shimano and White Brothers (at $100, it better
be). I have had only one click or clack out of many Shimano freewheels.
Meanwhile Dicta, WCS and the others from India and wherever are worthless
in my experience. One more thing that makes noise is worn SPD cleats.
They can squeak. So replace your Shimano
SPD cleats
before they get to that point and keep them lubricated, too."
Appreciate
it, Bill!
David
Axel Kurtz of Cambridge, Massachusetts, offers this crazy
noise-buster: "I ride a Specialized CruX Expert Carbon (2011,
the one w/the Zertz dampers & SRAM Apex). After about 500 miles
it began to develop a creaking noise. It would happen only on
the left pedal downstroke (my cassette, as usual, is on the right).
It sounded like it was coming from the bottom bracket. I could feel
it in my shoe.
It
was inconsistent. Some days it wouldn't happen
at all. Sometimes it would go away after a mile or two. Some days
it would be with me for 50 miles. Those days SUCKED. Sometimes it
would be softer, sometimes I-can't-ride-this-is-too-embarrassing
loud. Sometimes it would only happen on strong downstrokes. Sometimes
a few very strong downstrokes would make it go away.
I
ride clipless pedals; when I clicked out and pedaled only with my
right foot it didn't occur. I spun off the
pedals and put on non-clipless pedals (stolen from my girlfriend's
childhood 3-speed); it still occurred. I re-seated both wheels, the
chain, rear brakes, seatpost... tightened everything... oiled everything.
Nothing helped.
Solution:
Finally, while taking apart the ENTIRE BIKE, I noticed that the seat
tube had a sticker on it, about a foot down. Or what was left of a
sticker. It had been worn half to shreds and was doubled over itself.
I peeled away the sticker, jumped on the bike, and tried riding -
the noise was almost gone. I scrubbed the tube with the rough side
of a sponge, let it dry in the sun, and then gave it a little bit
of oil. Problem solved. CONCLUSION: Stickers are the devil."
That's a weird one! Thanks, David!
Ed
G. from Palm Beach, Florida fixed an aggravating clicking
noise on his 2014 Trek Madone.
Ed explains, "I was certain I had bottom bracket issues; the
noise was repeatable and occurred at about the same spots in the pedal
rotation. It was a clicking type of noise, fairly loud, and seemed
to go away if I lightened up on the pedals. So I thought it was related
to pressure on the crankarms and therefore the BB or bearings, or
perhaps the crankarm/spindle interface. A complete BB rebuild with
new grease did not make a bit of difference. I then noticed that the
noise would change slightly depending on whether I was riding the
brake hoods or using my aerobars. That prompted me to manually grab
the seat and move it up and down. I heard the clicking…or some clicking,
I should say. I was still not convinced that any source of seat-related
noise would be heard by the rider as BB noise.
Solution: I removed
the seat, and the one attach bolt. I found the surface between the
compression wedges and the main seatpost body to be almost dry (illustration).
There must have been enough minimal lube there to give me about a
hundred quiet first miles on the Madone. I applied a thin layer of
bike
grease
to the parts, and also to the clamp surface and the seat rails. My
rides since doing that have been totally quiet. I am now convinced
the clicking/creaking originated with the dry wedge/seatpost body
mating surface. It makes sense now; when I applied maximum pedal pressure,
the equal and opposite reaction caused me to push against the seat
in such a way that the noise from the compression wedge was initiated."
Nice detective work, Ed. So many
noises are caused by seatposts that you would think companies would
stop reinventing them. It's not like we haven't had foolproof designs
going back about 100 years. They should just stick with proven designs.
Attila,
a Hungarian now living in Switzerland wrote about a clicking noise he
figured out, "My bike was making clicking noises when I was out
of the saddle, or pushing the pedals hard while seated. The noise had
no relation to crankarm position, or cadence, simply when putting pressure
on the crankarms the bike made approximately 1-5 clicking noises in
some random pattern.
As
there was no play in the bottom bracket and otherwise the bike was running
smoothly, I ignored it for a while. Then one day when I had had enough,
I decided to get rid of it, but I didn't expect a 3-weeks long chasing
for the cause! First I ordered the tools and replaced the BB bearings.
No luck. Then systematically I tried almost everything, including many
of the things you list here, and including pedals and chainrings.
I
have to say lubing the spokes felt weird. :) After a good amount of
grease/lube and significantly more gray hair I turned my attention to
the bottom bracket again. I could reproduce the noise without the chain
on, just by applying pressure on the freely rotating crankarms, and
I have an MTB as well with the same BB30 standard. So I figured I could
crosstest the crankset by putting the MTB crankset on the road bike—it
doesn't have to be fully functional, it just has to be mounted, without
chain on, so that I can step on it.
Solution:
And that was it! The clicking has vanished. It seems the noise comes
from the road crankset where the axle is attached to the spider (BB30
axle is integrated with one side, in my case with the drive side). You
can't tighten it, you can't grease it, it's an integrated piece. I ended
up buying a new crankset.
For the record, it was an FSA Energy compact crankset that was clicking,
and the new one I ordered is from another brand, just to be sure.
Thanks
for the great tip, Attila, and great job finding and
fixing the noise.
This
one is courtesy of Bojan Tomic, who is 6,317 miles
from me, in Belgrade, Serbia. Bojan writes, "I just wanted to add
one occurrence that happened to me and was related to clicking-clunking
noises. I ride a relatively cheap MTB to work (steel frame, Shimano
Tourney equipment, 21 gears, KT Quando hubs) and this noise became apparent
a few months after purchase. I saw your bike-noises webpage and tried
to troubleshoot it, but had no success. First it started as a clicking-clunking
noise happening only when pedalling. It was infrequent, not loud and
didn't happen that often. When it did happen it was rhythmic. I checked
all axles/hubs/pedals for play, stiff links in the chain, all cogs for
bent teeth, and also all spokes, but everything was OK.
A
few weeks later it became louder and turned out to be a clear clunking
noise coming from the back wheel. It didn't relate to pedalling any
more (happened while freewheeling), and it happened irregularly now.
This time I thought it had something to do with the freewheel mechanism
(7 cog freewheel) and so I disassembled it, checked everything (bearings,
pawls, springs), and assembled it again. The problem persisted. Finally,
it got that bad that I could feel the clunk through the whole frame
and also feel the rear wheel "jump" each time this happened. Checked
the spokes again, but all was fine there.
Solution:
Then I disassembled the rear hub (KT Quando aluminium
freewheel 36 holes), and found out that some of the ball bearings inside
had disintegrated. Nine of the 18 steel balls had cracked, lost their
round shape and that was the cause. They were not made from stainless
steel but some cheaper variant. Fortunately, this did not ruin the hub
or the axle. Once I replaced all 18 bearings with stainless steel ball
bearings, re-greased and assembled the hub, everything worked out great
and I have no problem to this day."
Thanks
for helping solve another mysterious clicking, clunking noise, Bojan.
Benjiman
from the UK writes, "Thank you for your noise page, Jim. I've
had a random "clunk" sound & felt through the feet for
about 4 weeks now and it's been driving me up the wall as I couldn't
replicate it. Took it to couple shops for a check over and everything
is fine.
Was
out on a Sky Ride this past Sunday and a few folk heard it too but we
couldn't work it out. I checked your page and possible put it down to
loose crankarm/pedal or maybe the BB. But alas the problem was more
ninja than that.
After
seeing your section regarding a stiff chain link, I decided to put the
bike on a rack and turn the pedal slowly while watching for a stuff
link and I noticed something bizarre. The chain randomly, or so it seemed,
as it passed through the derailleur then on entering the rear cogs would
have one link just slightly rest on a neighbouring tooth before falling
in line on the cog. This didn't cause chain slip but a "clunk"
and didn't happen every time.
On
closer inspection it turned out to be the same link each time it did
happen. Not only that, it was notably different. The joining pin sat
flush with the outside edge of the chain (so on a visual inspection
looks fine) but on the inside stuck out by less than 0.5mm! Enough to
sometimes rest on the next cog's tooth before dropping onto the cog
it was meant to. It might be worth noting the joining pin is the one
that looks like an un-fired bullet case rather than all the other pins
having an indent.
Solution:
To fix the clunk required a chain tool and pushing the
protruding end of the pin in until it was centered in the link and barely
protruding on both sides, and by the same amount. Most likely, the pin
was pushed in too far during assembly and that caused the problem. It
was difficult to see because it was on the back of the chain. You have
to remember to look on that side of the chain to find this issue"
Thanks
for this great clunk fix, Benjiman.
Jess
from Southhampton in the UK, shared a couple of tips on other noises:
“While this isn't really a problem or something that has a solution,
I thought I'd mention it as like many, I've only recently started using
hub gears on one of my bikes. [Editor's note: on a hub gear bicycle
the gearing is inside the rear wheel's hub - also called “internal
gearing.”] In normal use, in some gears you can hear a tick tick
tick noise as though you're freewheeling. This includes the 1:1 gear,
sometimes misleadingly referred to as "direct drive." I thought it a
bit worrying when I'm used to silence. Also my Brooks
leather saddle creaks but this is definitely due to leather on metal.
My solution has been to apply proofide leather dressing to the squeaky
points and gently melt it in with a hair dryer. This seems to need occasional
(12-18 monthly) reapplication.”
Thanks
Jess.
Enrique
Hernandez from Fort Lauderdale, Florida found out that when
it comes to solving bike noises, looks can be deceiving: “I have
one for your readers, Jim: I ride a 2018 Fuji Roubaix, and I try to
keep it in as good a shape as I can. All of a sudden, it developed
an intermittent creak that started just sporadically and got progressively
worse in the couple of weeks I couldn’t figure out where it was coming
from. I took care of all the usual suspects: cleaned and regreased
the bottom bracket seals, regreased both QRs, seatpost, derailleur hanger...
nothing. I tightened the pedals, crank arm, stem bolts, seatpost, both
derailleurs, but the creak was still there. I opened up my pedals just
to make sure they still had grease in them, they did and it looked clean.
But, I figured that after about 8,000 miles it was probably a good idea
to give them a thorough cleaning. SOLUTION:
I took them apart, degreased everything and repacked them. And to my
surprise, when I put them back on and went for a ride to keep trying
to identify the source of the creak... silence at last. They are a pair
of Wellgo MG-8 SPDs, and it was fairly straightforward to repack them.
I would have never found the source of the creak if I hadn’t just thought
of cleaning them regardless. I am usually pretty good with regular maintenance
and like I said, the grease looked clean. Looks can definitely be deceiving....”
Thanks
Enrique, that would have deceived me, too. Good job figuring it out!
 Solution:
A lot of new bicycles have pieces bolted on the rear dropout that make
it possible to replace the derailleur hanger if it gets bent (the part
that the rear derailleur is attached to). These are usually held on
with bolts. If the bolts loosen, the hanger can move and make a click
noise. To fix this, loosen the bolts, grease
Solution:
A lot of new bicycles have pieces bolted on the rear dropout that make
it possible to replace the derailleur hanger if it gets bent (the part
that the rear derailleur is attached to). These are usually held on
with bolts. If the bolts loosen, the hanger can move and make a click
noise. To fix this, loosen the bolts, grease
 I
get lots of questions about bicycle noises because they drive cyclists nuts, like my teammate in the
photo who I’m (green shirt) helping find a noise before his
race in the Watsonville Criterium.
I
get lots of questions about bicycle noises because they drive cyclists nuts, like my teammate in the
photo who I’m (green shirt) helping find a noise before his
race in the Watsonville Criterium.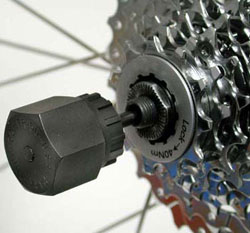 Solution:
Feel for play by trying to move the cogs laterally with your fingers.
Use a
Solution:
Feel for play by trying to move the cogs laterally with your fingers.
Use a 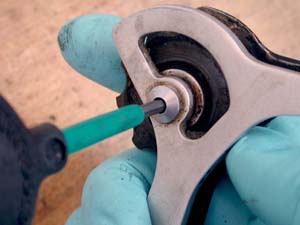 Solution:
Rest your bike on its side and apply a few drops of oil between the
pulleys and sideplates to silence them. Wait a few minutes for the
lube to penetrate, then wipe off any excess. Still squeaking? You’ll
need to remove them (photo), take them apart and grease each part
before reassembling with a good
Solution:
Rest your bike on its side and apply a few drops of oil between the
pulleys and sideplates to silence them. Wait a few minutes for the
lube to penetrate, then wipe off any excess. Still squeaking? You’ll
need to remove them (photo), take them apart and grease each part
before reassembling with a good 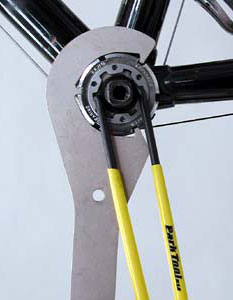 If
you hear or feel a clunk when pedaling, it’s probably
caused by a loose bottom bracket or pedal.
If
you hear or feel a clunk when pedaling, it’s probably
caused by a loose bottom bracket or pedal.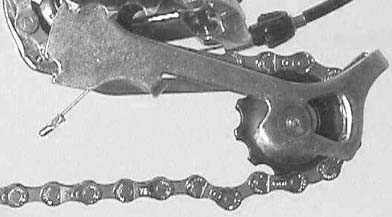 Solution:
First crouch down next to the drivetrain side of the bike and pedal
backwards looking for a stiff link because stiff links can cause this
problem and they’re relatively easy to fix. TIP:
If you have a stiff link, you’ll experience skipping in all
the gear combinations. You will be able to spot a stiff link as you
pedal backwards with your hand and watch the chain pass through the
rear derailleur pulleys. A stiff link won’t be able to curve
to follow the contours of the pulleys so you’ll see it trip
as it goes through (photo). If you spot the stiff link, move the chain
so the bad link is in the middle of the chainstay (the lower frame
tube between the crank and rear wheel) and then flex the chain sideways
at the link to free it. Don't flex it too hard or you'll bend it and
you don't want bends in your chain. If flexing it doesn't work, try
using a
Solution:
First crouch down next to the drivetrain side of the bike and pedal
backwards looking for a stiff link because stiff links can cause this
problem and they’re relatively easy to fix. TIP:
If you have a stiff link, you’ll experience skipping in all
the gear combinations. You will be able to spot a stiff link as you
pedal backwards with your hand and watch the chain pass through the
rear derailleur pulleys. A stiff link won’t be able to curve
to follow the contours of the pulleys so you’ll see it trip
as it goes through (photo). If you spot the stiff link, move the chain
so the bad link is in the middle of the chainstay (the lower frame
tube between the crank and rear wheel) and then flex the chain sideways
at the link to free it. Don't flex it too hard or you'll bend it and
you don't want bends in your chain. If flexing it doesn't work, try
using a 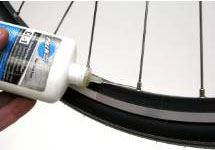 Solution:
As
said previously, I had flooded the spoke nipples with lube. The nipples
are slightly smaller than the rim holes and I had made sure that lube
got into this gap as well...... but maybe it wasn't enough. Maybe
it needed more. So, I removed the tire, tube and rim tape and sprayed
inox directly onto the back of the nipples inside the rim cavity.
BINGO, I had a silent bike again. For an obsessive compulsive perfectionist,
this is a very important thing. Simply riding along ignoring clicks
and creaks is not an option.
Solution:
As
said previously, I had flooded the spoke nipples with lube. The nipples
are slightly smaller than the rim holes and I had made sure that lube
got into this gap as well...... but maybe it wasn't enough. Maybe
it needed more. So, I removed the tire, tube and rim tape and sprayed
inox directly onto the back of the nipples inside the rim cavity.
BINGO, I had a silent bike again. For an obsessive compulsive perfectionist,
this is a very important thing. Simply riding along ignoring clicks
and creaks is not an option.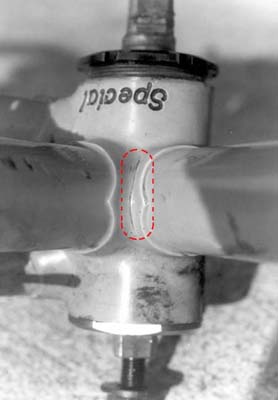 Solution:
Listen carefully to try to determine what part of the frame the noise
is coming from and then inspect that area for cracks (it’s best
to clean the frame first so that debris can’t hide the defect).
Common failure points include tube intersections, especially at the
bottom bracket and fork crown, and also the dropouts. If you think
you see a crack but aren’t sure, try pushing sideways on the
frame with your foot, which will usually open the crack making it
more visible. If you find a crack or think you’ve found one,
stop riding the bike and visit your bike shop for an expert opinion.
Some framesets will be replaced under warranty, though the shop will
charge labor to switch the parts over in most cases.
Solution:
Listen carefully to try to determine what part of the frame the noise
is coming from and then inspect that area for cracks (it’s best
to clean the frame first so that debris can’t hide the defect).
Common failure points include tube intersections, especially at the
bottom bracket and fork crown, and also the dropouts. If you think
you see a crack but aren’t sure, try pushing sideways on the
frame with your foot, which will usually open the crack making it
more visible. If you find a crack or think you’ve found one,
stop riding the bike and visit your bike shop for an expert opinion.
Some framesets will be replaced under warranty, though the shop will
charge labor to switch the parts over in most cases. Solution:
For quiet operation, pads must be in good condition and “toed-in,”
which means that the front of the pads contacts the rim before the
rear. If the pads are several years old, replace them. If they’re
striking the rim flat, carefully
Solution:
For quiet operation, pads must be in good condition and “toed-in,”
which means that the front of the pads contacts the rim before the
rear. If the pads are several years old, replace them. If they’re
striking the rim flat, carefully 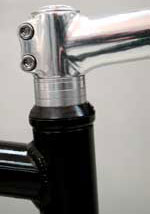
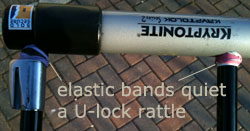 Reader
Joshua Naylor came up with a quick and simple way to silence his U-lock.
When he carried it on his bicycle in the carrier that came with
the U-lock, the lock would make a rattle over every bump. Solution:
It was the loose fit between the U part of the lock and the crossbar
that made the racket. So Joshua came up with the elegant solution
of wrapping elastic bands around the ends of the U and he now enjoys
solitude on his rides again.
Reader
Joshua Naylor came up with a quick and simple way to silence his U-lock.
When he carried it on his bicycle in the carrier that came with
the U-lock, the lock would make a rattle over every bump. Solution:
It was the loose fit between the U part of the lock and the crossbar
that made the racket. So Joshua came up with the elegant solution
of wrapping elastic bands around the ends of the U and he now enjoys
solitude on his rides again.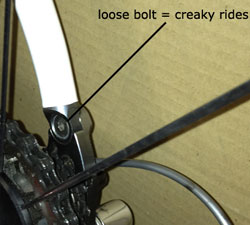 The
rest of your article addresses the creaks and clicks that always show
up. Now I have a systematic way to fix those also." Thank you
again! Mike Salameh.
The
rest of your article addresses the creaks and clicks that always show
up. Now I have a systematic way to fix those also." Thank you
again! Mike Salameh.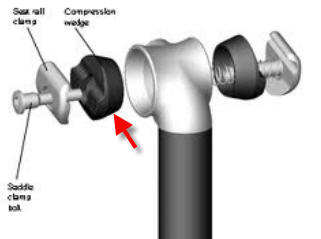 Madone.
Ed explains, "I was certain I had bottom bracket issues; the
noise was repeatable and occurred at about the same spots in the pedal
rotation. It was a clicking type of noise, fairly loud, and seemed
to go away if I lightened up on the pedals. So I thought it was related
to pressure on the crankarms and therefore the BB or bearings, or
perhaps the crankarm/spindle interface. A complete BB rebuild with
new grease did not make a bit of difference. I then noticed that the
noise would change slightly depending on whether I was riding the
brake hoods or using my aerobars. That prompted me to manually grab
the seat and move it up and down. I heard the clicking…or some clicking,
I should say. I was still not convinced that any source of seat-related
noise would be heard by the rider as BB noise.
Madone.
Ed explains, "I was certain I had bottom bracket issues; the
noise was repeatable and occurred at about the same spots in the pedal
rotation. It was a clicking type of noise, fairly loud, and seemed
to go away if I lightened up on the pedals. So I thought it was related
to pressure on the crankarms and therefore the BB or bearings, or
perhaps the crankarm/spindle interface. A complete BB rebuild with
new grease did not make a bit of difference. I then noticed that the
noise would change slightly depending on whether I was riding the
brake hoods or using my aerobars. That prompted me to manually grab
the seat and move it up and down. I heard the clicking…or some clicking,
I should say. I was still not convinced that any source of seat-related
noise would be heard by the rider as BB noise.