In 1971, I rode a Peugeot ten-speed into the White Mountains of New Hampshire, 120 miles from my home, without a clue what I was doing. I brought no cash. I didn’t eat or drink. I didn’t know how to shift gears. I didn’t wear cycling clothes. I had no way to fix a flat and wouldn’t have known how to do the job even if I’d had the tools to do it. Starving, cold and miserable, I spent a sleepless night next to a river. I decided at daybreak that I’d pedal home — if I could — or hitchhike there if I couldn’t.
It’s funny how fate changes things. Rolling along the next morning I was so dizzy from hunger I could barely balance to coast down the road when Galen Farrington pedaled into my life. An experienced cyclist from New Mexico, he was touring New England, and he passed me on a little climb like I was stuck in cement. The cool thing was, he stopped just up the road, waited for me to catch up, and said, “You don’t look so good.”
He led me to a restaurant and bought me a meal. Then he rode with me at my ridiculously slow pace for about an hour, the entire time teaching me how to ride my bike. He even spent a while adjusting the derailleur so it would shift perfectly. I never saw Galen again. But in that brief encounter, he turned a pedaling fool into a cyclist. Because he made me realize that there was a lot to learn about riding a ten-speed. And that every little skill, technique and tip I could learn would make riding all that much easier and that much more fun. [Thanks to some kind readers, I've reconnected with Galen and learned the he's become a highly regarded cycling coach.]
What follows are some of the ride rules that Galen taught me; and others that I’ve learned since.
 |
Hanging On
Because your hands do a lot of the work while you’re riding, they’re prone to fatigue, even damage. Most problems can be prevented by frequently changing hand positions. One of the great advantages of the drop-style handlebar that’s found on many road and touring bicycles is that it provides many different grips. It’s possible to grab on the drops, on the tops, on the brake lever hoods and elsewhere. Every ten minutes in fact, you should take another hand position. This will alleviate pressure on the nerves in the palms that can cause numbness and tingling, while helping to keep your upper body relaxed.
There are fewer options on mountain-style handlebars and other upright designs. If you have bar ends, use them. And don’t rule out gripping portions of the bar just because they’re bare metal. If there’s a place to rest your hands safely (always maintain a secure grip), by all means move them there occasionally for a change.
|
|
Pedaling
Ideally, you should relax and let your feet and ankles assume a natural position while pedaling. But there is one tip that may help smooth your pedal stroke and provide a power boost on climbs: If you can learn to pull straight back on the pedals when each reaches the 3 o’clock point on the stroke, you’ll discover with practice that you can generate more power.
Most people focus on the downstroke. But this part of the stroke is natural. Even if you didn’t think about it, you’d manage fine. The key to smoothing the stroke and making it as round as possible is training yourself to pull back. The motion is similar to what’s used to scrape mud from the bottom of your shoes. If you want to immediately feel what it can do for you, try it the next time you’re riding uphill. With enough practice, you won’t have to think about it and your pedal stroke will become rounder and more efficient.
|
|
Climbing
Speaking of hills and hand positions: usually it’s best to stay off the drops on climbs. Bent over that low, your diaphragm is compressed making it difficult to breathe deeply. Placing your hands on the brake lever hoods will open your chest allowing your lungs to expand more. This works nicely when seated and standing. If you want even more air when seated, place your hands right next to the stem a position that raises your torso and opens your lungs fully.
When you stand to climb, relax! There’s no need to choke the handlebars, bar ends or brake hoods with a vise-like grip. Doing so will only tense the upper body, make it more difficult for you to react to surprises and tire you out faster. Instead, use a loose grip and let your legs and body weight do the work as you rock the bike slightly side to side.
|
|
Cornering
One crazy rule of cycling is that you should never look where you don’t want to go. And it’s true that the more you stare at an obstacle, the more likely it is, you’ll run right over it. This can be a dangerous problem in corners. If you fixate on the line you’ve picked to carve the corner, you may ride right out of the turn and off the road.
I recommend looking to the inside of the turn. And don’t just turn your eyes. Actually rotate your head slightly so you’re looking just to the inside of the line you want to follow around the bend - or in a tight turn, almost at the road’s edge or centerline. This will make it much easier to hold the correct line around scary corners. Be safe though. Practice cornering techniques at slow speed until you’re comfortable.
|
|
 Descending Descending
Being that it’s the most efficient machine in the world (see the Ivan Illich quote on my Bike Fit page), it should be no surprise that a bicycle pointed downhill can accelerate frighteningly fast.
You could hit the brakes every time to get things back under control. But that might lead to skidding, wears the brake pads and could surprise following ride partners. A sensible alternative is changing your body position to slow down.
By sitting taller or moving from gripping the drops to the brake hoods and spreading your legs a bit, your body will catch much more air, which will slow you down parachute-style. Of course, this trick only scrubs off some speed. If you really need to slow hard, use the brakes, preferably together, squeezing the rear a bit harder than the front at first and then applying more pressure as needed.
Dealing with speed wobble, shimmies
Many cyclists experience a terrifying phenomenon on really fast downhills called speed wobble or shimmy. What happens is, at a certain speed the bike begins to shake side to side, sometimes wobbling violently. Many things can cause this to happen and it’s not always the bike’s fault. So it’s good to know ways to prevent and stop it should you experience it.
First, don’t panic and slam on the brakes. That usually won't help and it could increase the wobble. Instead, try this: clamp your knees against the top tube of the bicycle, which braces a main frame tube, and should stabilize the bike and stop the wobble, allowing you to brake and get control of the bike. Riders who’ve experienced wobbles always rest a knee against the top tube when descending fast as insurance.
|
|
Shifting
Most people don’t shift enough, which leads to premature drivetrain wear, sore knees (or worse) and one tired rider. Here’s how to shift a bicycle: Think of yourself as the bike’s engine. Like an auto engine, you’re most efficient pedaling at a certain rate, usually from 70 to 90 pedal revolutions per minute. To maintain this efficiency, shift every time you feel your pedaling rate (called cadence) slow or speed up. Following this rule, on a rolling course, you’ll be shifting almost constantly to maintain that steady cadence. But at ride’s end, you’ll be fresh while a ride partner who shifts less will be spent.
How do you know what gear to select? First, don’t get confused by the many choices, and don’t worry about harming the bike by shifting it “wrong” — you can’t hurt it as long as you slightly ease the pedal pressure when shifting (you must pedal to shift). And understand that the correct gear is any gear that allows you to pedal comfortably at the moment. There’s no right or wrong gear and there’s no proper sequence to follow. You just shift when your body tells you it’s time for a change.
Shifting the right lever one click makes it slightly easier or harder to pedal. Think of this lever as a way to fine-tune the effort required to pedal. As you pick up speed on a slight downhill for example, you’d click the lever once or twice to shift into a better gear for the speed. Shifting the left lever makes large differences in pedal effort. Think of this lever as a way to make it considerably easier or harder to pedal. Dropping into a valley for instance, you’ll want an easy gear to get back out. But, you’ll probably be in a hard gear because you were just riding downhill. To make the pedaling easy immediately, shift the left lever to move the chain onto a smaller chainring providing much easier pedaling.
If you’re at all nervous about shifting, practice. A good way to do this is to shift the bike when it’s supported on a stand. You might place the bike on a trunk-style bike rack or in a repair stand, hang the nose of the seat on a low branch, or ask a friend to hold the bike off the ground by the seat. Once the bike is supported, use one hand to pedal and the other to shift while watching the chain move over the cogs and chainrings. With a few sweeps of the levers, you’ll get a clear understanding of what’s going on back there and should feel more comfortable about shifting a lot while riding.
|

to the CRANK page
|

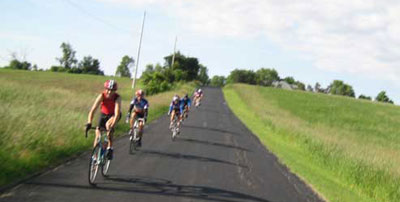
 This dude is exhibiting textbook cornering skills