Please
note: This article and video explain how to position bicycle clipless pedal cleats
on cycling shoes (road and mountain). I have fit hundreds of cyclists and I share the basic cleat position settings that work for most riders. If you are looking for information on how to install
and remove pedals, please go here.
A
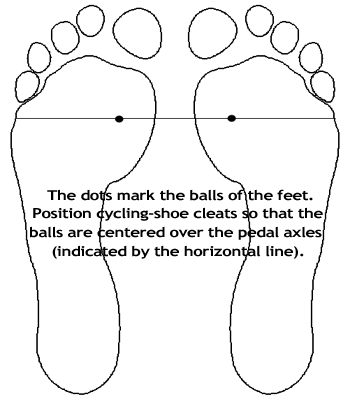
good neutral starting cleat position that works for most riders is to
place the cleats so that when the shoes are clipped into the pedals,
the balls of the feet are directly over the center of the pedal axles
(also called the pedal "spindles").
It
can be tricky to locate the exact ball of your foot and place the cleats
so that the balls are directly over the pedal axles. Note that the ball
of the foot is defined by Biology-Online.org
as “the padded portion of the sole, at the anterior extremity
of the heads of the metatarsals, upon which the weight rests when the
heel is raised.”
So, if you stand with your bare feet fully on the ground they touch
at the heels, the balls of the feet and the toes (assuming you're not
completely flat-footed). And, if you stand on tip toes, you are standing
mostly on the balls of your feet.
Again, you should position your cleats to center the balls of your feet
over the center of your pedals axles (see diagram).
Here's
an easy way to get it right
1.
With your shoe nearby, and with bare feet, place a dot of paint on the center of the ball of one
foot. If you can't see the bottom of your foot well enough to do this
accurately, have someone help you. 2.
Immediately, so that the paint doesn't dry first, slip on
your shoe and close it and stand to put pressure on your foot. 3.
Remove
the shoe and you should find the paint dot transferred to the inside
of the shoe clearly marking the ball of your foot. Repeat steps 1, 2
and 3 with your other foot. 4.
If you
can't see the dots on the insides of your shoes from the outside when
you're positioning the cleats, use this workaround: simply stick a
straight pin through the side of each shoe (the side next to the crankarm).
Make sure the pin exactly bisects the mark inside the shoe and sticks
straight out of the shoe, not at an angle. Now, when you flip the shoes
over to position the cleats you will have a pin in each as an indicator
telling you exactly where the cleats needs to be positioned to put the
balls of your feet directly over the pedal axles (note that you could
also look at the pins and draw a line on the shoe soles if you prefer).
Usually centering the cleats over the pins will be the right spots to
center the balls of your feet right where they should be directly over
the pedal axles.
Exceptions
Try the ball-over-the-pedal-axle position first and give it a chance
to see if it feels right because it works for most riders. If it doesn't
feel right, the most common adjustment to make it feel better is to
move the cleats back slightly, perhaps 1/2 inch. This puts a little
more of your foot over the pedal. This is often preferred by larger
riders with longer legs, people who push bigger gears, climbers and
time trialists, riders using long crankarms and slower pedalers.
Conversely,
if you tend to ride at a high cadence, spin smaller gears, like sprinting,
ride shorter crankarms and are a toes-down pedaler, you might move the
cleats forward slightly, but don't overdo it. Maybe about 1/4 to 1/2
inch (about 6 - 10 mm). If you get too far out on your toes you increase
the risk of "hot foot" and even achilles injuries so experiment
but only a little at a time.
Lastly,
if you're an ultra-distance rider you may want to push the cleats all
the way back. This type of riding often causes numbness and hot foot.
A great solution discovered by long-distance champ Lon
Haldeman is moving the cleats fully to the backs of the slots, which
relieves pressure on the feet and has no negative side effects for this
type of riding, apart from a slight increase in the possibility of toe
overlap with the front wheel if you're riding a bicycle with aggressive
front-end geometry.
Angle
adjustment
Most clipless systems include some "float," the ability of
the cleats to move slightly so that you will automatically find a natural
angle to hold your feet when pedaling. However, it's important to get
the cleats close to the right position when mounting them. If they're
angled incorrectly there might not be enough float in the system to
allow you to correctly position your feet, which could result in pain
when riding or even a knee or foot injury. It can also make it harder
to get in and out of clipless pedals.
A
good neutral starting position that works for most riders places the
cleats so that when the pedals are mounted in the shoes there is space
between the heels of the shoes and the crankarms that's about 3/4 of
an inch (2 cm), or about the width of an average man's index finger.
If
you experience any discomfort when cycling that's associated with your
cleat position, I recommend visiting a shop with an experienced cleat
fitter and paying a professional to dial-in your position.
Two tricks that help some riders: If you adjust your cleats
carefully and still find that your ankle(s) is too close to the crankarm
and sometimes brushes it (or worse), a simple fix is to place an automobile
spark plug washer(s) between the pedal(s) and crankarm(s). The washer
will slip right over it, not effect the threaded connection to the crankarm
and provide a couple of mm of clearance.
If you need more clearance, a great solution is SCOR Productions’
KneeSavers. These are custom pedal extensions that allow you
to add 20, 25 or 30mm between your pedals and crankarms. You can read
all about them and place an order here.
A reader also told me about this generic version of these extenders.
Mark
the position
Once the cleats are perfectly positioned on your shoes be sure to mark
them so that when they need replacement it's easy to find the perfect
position. Some shoe soles have marks on them for this and some cleats
come with marking stickers, etc. Or, you can just trace a line around
the shoes in indelible ink. Or try a gold paint pen for carbon-sole
shoes.
More
tips
Be sure to lubricate your cleat bolts before installation, which will
ensure you can get them tight enough to remain tight. And, be sure to
check the bolts/screws after a few rides to make certain they are remaining
tight.
If
you keep a spare set of cleats on hand you will always have them if
the cleats on your shoes become too worn or they break. Spare cleats
also come in handy for comparing with your used cleats to determine
if they're worn enough to replace them yet.
Speaking of cleat wear, you might look into rubber covers for your cleats,
which are offered by a few companies. You carry them on rides and slip
them over the cleats when you stop for protection and for additional
traction when walking. Here are the covers I use for my Look Keo pedals.
Be
sure to keep your clipless pedals and cleats lubricated where they meet
each other to prevent clicks and
creaks. A good cure is the car-care spray Armor All, which you can
find in any hardware store. This works on plastic, carbon and metal
cleats/pedals.
(Many thanks to www.spraypaintstencils.com
for use of the basic footprint graphic I adapted for the diagram.)
 A
good neutral starting cleat position that works for most riders is to
place the cleats so that when the shoes are clipped into the pedals,
the balls of the feet are directly over the center of the pedal axles
(also called the pedal "spindles").
A
good neutral starting cleat position that works for most riders is to
place the cleats so that when the shoes are clipped into the pedals,
the balls of the feet are directly over the center of the pedal axles
(also called the pedal "spindles").